Showing posts with label paper crafts. Show all posts

Sunday, October 23, 2011

Mix and Match Alien Magnets {Tutorial AND Printables!}


Here is a fun Halloween craft!  We like Halloween around here but we do not do scary!  I am a big friady cat {Scooby Doo used to give me nightmares!} so we keep things light and fun!  Here is a perfect non-scary Halloween project with cute and silly aliens!
 
Here is what you will need:
Alien Printables (available below)
Foam Board
Scrapebook paper
Magnets
Marker/crayons/colored pencils
Mod Podge
Exato Knife/Scissors/Paper Cutter

1. Print off the Aliens.  Here are the alien printables.  Just click on the link to download. 
I drew these aliens myself... for personal use only! 

Mix and Match Aliens Printable 1
Mix and Match Aliens Printable 2
Mix and Match Aliens Printable 3
 
2. Color in your alien...I did it with marker here... however when I mod podged them later, they did bleed so I suggest using color pencils or crayons.

3. Measure off 3 inch squares {this works with the printables} on your foam board and cut it using  your Exato Knife

You will need 3 squares per alien.

4. Cut out your scrapbook paper into 4 inch squares (you want them bigger then the foam board squares so that we can cover the sides too.)

5. Trace your foam board square into the middle of the BACK SIDE of your scrapebook paper square.  then cut a slit on each corner down to where your traced the foam board.

6. Mod Podge your paper to your foam board.
A. Brush mod podge on the back side of your paper and on the foam board.
B. Place the foam board on to the middle of your scrapebook paper and fold the sides around it.
C. Cut off the extra corner pieces.
D. Mod Podge over the top of the edges on the back side to seal it.

7. Cut your alien into 3 parts: Head, Body/arms, Legs.  Use your squares to help you.

8. Mod Podge your alien to your squares.  Mod Podge over the bottom and top to seal it.

Repeat for all the aliens!

9. Attach your magnet to the backside of each square. 

Hang on your fridge and play!

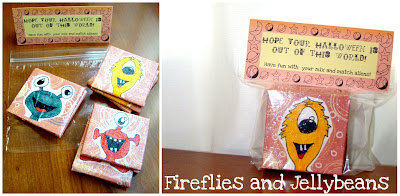
Here they are all mixed up!

We even sorted them into different body parts

These would make a great little gift for your niece, nephew, grandchild, friends...etc!
Just grab a ziplock baggie, one of the printable tags below, and 3 sets of aliens.  Put the alien pieces in the bag.  Fold the tag in half and staple it to the bag.  All set for a cute non-candy, non-scary little Halloween gift!  Click on the links below for the tag printables.
Orange and Yellow Tag
Black and White Tag

Check out this cute block version I made with the same alien prinables:
It is over at the DIY Club... CLICK HERE for the full tutorial


Linking to:
Skip to my Lou Made by You Mondays
Todays Creative Blog
Home Stories A2Z

Tuesday, October 18, 2011

Big Paper Pinwheel Flowers

Here is a fun and easy way to dress up your room or party! 

Here is what you need:
Decorative Paper from CanvasCorp
Adhesive Cork stock from CanvasCorp
Twine from CanvasCorp
Decorative Clothespins from CanvasCorp
Glue Gun
Stapler
Paper cutter/Scissors
{ignore the thread!}

1. Cut your paper in to four 6X12 inch strips... I used two 12X12 Papers for one large flower

2. Take one strip and accordion fold it all the way across.  My folds were about about an inch wide.
Repeat for all 4 strips

3. Staple your strips together to make one long folded strip

4. Staples the ends together to make a circle

5. Use something round and trace a circle on the back of your cork stock.  Cut out the circle and use your hot glue gun and put hot glues all around the outside of the circle.

6. Push down the center of your circle to make the flower.  Glue your cork stock to the center and wait for the glue to cool and flip it over

7.  run your twine through the clothespin and tie it to make a loop.

8. Hang it from a tack or nail

9. {optional} make more and hang them up together!


Content Ad