We are sick around here... my whole family has it. We are pretty pathetic!
We have high fevers, coughing, throw up and loss of sleep. We have had it for 5 days now and are at the point where we have forgotten what it is like to feels well!
What ever it is, I hope you don't get it!
So, we are working on feeling better... I have a fun craft and party theme for you when we do!


Monday, February 28, 2011
Friday, February 25, 2011
Feature Friday: Joy from Momma's Kinda Crafty

HI! I am Joy from Momma's Kinda Crafty!
You can visit me here:
I am a mom to 4 crazy wonderful kids. Been married for over 15 years. We have recently finished school (whew!finally!) and moved to Montana. It is so nice to be a little closer to family. In my stolen moments, (nap time, late at night, ect.) I love to craft and sew!
Yellowstone Park, August 2010
Today I want to share with you a fun craft I just finished for St. Patrick's Day!
To make my Glittery Shamrock Canvas, you will need:
An artist canvas, mine is 10x10
Green craft paint
Mod podge, I used both matte and glossy finish
Green Glitter
Silver sequins
Cut out of shamrock (just draw an outline and cut the shape out)
A little patience....
Let dry.
Cut out your shape. And lay your pattern on your canvas. If you need to tape the edges down, go ahead. Now cover your shamrock opening with Mod podge. Lay it on thick!
Then cover with glitter until well coated. Shake off and reapply mod podge and glitter if you have any bare spots.
Remove pattern and let dry a bit.
I did the next step a little at a time. Coat an area of your canvas with mod podge. Cover with sequins.
Do the same to the rest of the canvas a little at a time. You will need to shake your canvas a few times to make sure to get off any sequins that are not sticking. Once it is covered, let dry.
Apply a coat of glossy mod podge over the whole canvas. Do not brush the mod podge on, just use your brush and dab it on all over to cover. Let dry again.
I just love the way it looks in different lighting!
Thanks for letting me share with you today, and please come on over for a visit anytime!

Want to have your tutorial featured here on Fireflies and Jellybeans? Click HERE for more details!
&
Wednesday, February 23, 2011
Show Off Your Stuff Party # 63
Welcome to the Show Off Your Stuff Party! The place where we all get together and SHOW OFF OUR STUFF!!
This week I am showing off:
My cute baby gifts!

And you can win THIS DRESS from Shabby Apple!

Click Here to enter!
Now it is your turn!!
Here are the rules:
1. Link up a post that you want to show off!
PICK ONE PLACE TO LINK UP YOUR POST: CRAFTS, DIY OR RECIPES... BUT PLEASE NOT MORE THAN ONE!!
If you get the wrong one... that is ok you will get it right next week! ; )
If you get the wrong one... that is ok you will get it right next week! ; )
Don't know where to put it... just pick on and go with it! : )
2. Add a link to your specific post, not the main page of your blog.
3. Please do not link up to something that you are just trying to sell. (If you are making it as a tutorial and selling in your shop as well that is fine.) This is not the place to advertise. Thanks :) Please don't make me be a meanie and delete these!
4. Link to this party from your post so everyone can get in on the fun. You can just grab my button!
5. By entering your link, you are giving me permission to use any part of your post including pictures in a spotlight on Fireflies and Jellybean. (Proper credit and links will be given to you, of course!)
Sewing and Crafts
DIY and Home Decor
Recipes
&
Tuesday, February 22, 2011
Baby boom! More Baby Gifts!
I know that it seems like all I do is post baby gifts that I make for my friends and family, but there is a SERIOUS baby boom going on around here so, I will probably post more! :)
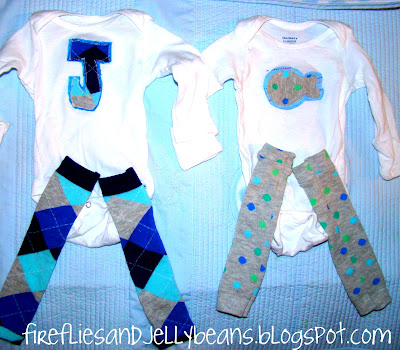
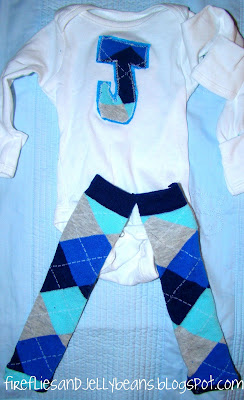
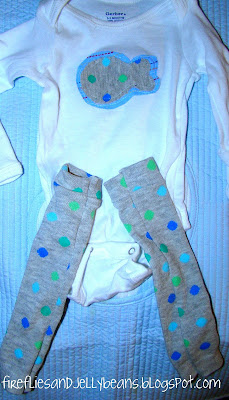
Here is my latest baby gift! For a baby boy that was born premature (He is doing great now!) I wanted to give the mommy something for her little peanut to wear right now that would not look like he is drowning in it!
Here is my latest baby gift! For a baby boy that was born premature (He is doing great now!) I wanted to give the mommy something for her little peanut to wear right now that would not look like he is drowning in it!
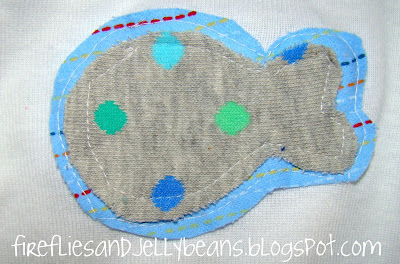
Appliqued Onesies with matching leg warmer!
The leg warmer act as pants and make diaper changing so easy!
I made my leg warmers from knee-high socks.
{You can use this tutorial from Sew Much Ado}
I made the leg warmers skinner (since we are talking about a preemie), I just took in the sides.
I made the leg warmers skinner (since we are talking about a preemie), I just took in the sides.
It is always nice to give a personalized gift!
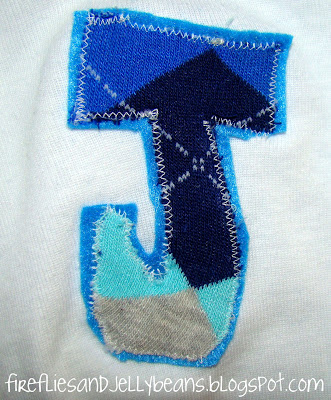
This one has the baby's first initial!
And who can resist those argyle leg warmers!

And the polka-dots are darn cute too!

I used the sock material left over from making the leggings.
Sock material is not the easiest material to applique with (it likes to curl on the edges).
But I fought my way through to get this cute wonky little "J"

I made my own patterns by free handing the shapes (or letter)... nothing too fancy... simple is better!

I love making baby gifts!
Monday, February 21, 2011
Shabby Apple Dress Giveaway!
***This Giveaway is Closed!***
I am so excited to be doing a Shabby Apple Giveaway! I mean, their dresses are AMAZING!
I am so excited to be doing a Shabby Apple Giveaway! I mean, their dresses are AMAZING!


They also have gorgeous Maternity Dresses

And lets not leave out their adorable Little Girls Dresses
Here is the dress that you can win: Nine to Five!
I love the color and style! I wish I could win my own giveaway!

Here is the dress that you can win: Nine to Five!
I love the color and style! I wish I could win my own giveaway!
Here is how you can enter:
Be sure to leave a separate comment for each entry!
1. Visit Shabby Apple and tell me your favorite dress
2. Like Shabby Apple on Facebook
3. F&J followers get an extra entry!
Shabby Apple is also giving F&J readers a 10% discount with the code: firefliesandjellybeans10off
&
Last day to enter the DIY Club's monthly party!!
Today is the last to to enter the DIY Club's monthly party ! They have NEW guidelines so that more people can enter to win the FABULOUS prize package!

This is a big deal! The prize package is one of the biggest prizes that you can win out there in blogland!
Friday, February 18, 2011
Featured Friday: Joon from the Adventures of Ordy and Joon!
Hello Fireflies and Jellybeans readers! I can't wait to share this easy craft with you guys! My name is Joon and you can find my blog: The Adventures of Ordy and Joon!
To sum me (and the gist of my blog in a nutshell): I am a 20-something year old with a busy schedule and a love for crafts! I'm a full time law student, obsessed with my mutt, in love with my boyfriend (Ordy Boy) and I am addicting to crafts and home decorating! My blog is an assortment of all things crafty/decorative/thrifty!

I love this particular craft because it is SO SIMPLE and so versatile! You can find the craft step by step here: http://ordyandjoon.blogspot.com/2011/01/conversation-centerpiece.html
You can do this craft for ANY holiday just by swapping out the candy! (Candy Corn for halloween, jelly beans for Easter, etc...) Let's begin!


And all you need is:

Conversation Hearts
A Vase
A SMALLER vase that fits in the larger one
with enough space (half an inch) to create a wall
of hearts- Preferably the same height as the outer
vase
with enough space (half an inch) to create a wall
of hearts- Preferably the same height as the outer
vase
THAT'S IT! Oh, and amazing flowers your love picks
you up :)
you up :)
I originally used the vase you see above in the picture
because I broke my OTHER vase I usually use and really had
a bee in my bonnet to just GET THIS THING STARTED...but...I
decided the shape of the bottom of the red vase rounded too
much (meaning more hearts being used as filler...) So, I
was resourceful, just like YOU can be!
because I broke my OTHER vase I usually use and really had
a bee in my bonnet to just GET THIS THING STARTED...but...I
decided the shape of the bottom of the red vase rounded too
much (meaning more hearts being used as filler...) So, I
was resourceful, just like YOU can be!

straight down shape worked PERFECTLY. and it was the
perfect height.

The flowers in the candle jar :)


important, because if you did what I did before the
tutorial pics, you will spill water all over your hearts
while filling the smaller vase at the end. and you will get
soggy hearts. Like this:
 |
| upper right: soaking. sad. words 'melted' off haha |


I'd love to see a picture if you try this! It is SO ridiculously easy! AND AWESOME!
I would love for you to stop by The Adventures of Ordy and Joon and say "Hi!"
Want to have your tutorial featured here on Fireflies and Jellybeans? Click HERE for more details!
Subscribe to:
Posts
(
Atom
)