Showing posts with label Home Decor. Show all posts

Saturday, December 13, 2014

Simple Classic Christmas Wreath

I am teaming up with QVC  to make this Classic Christmas Wreath

I was sent this Pre-lit Christmas Wreath (Designed by Ellen DeGeneres) to decorate.
They had me at pre-lit!  
It really is beautiful just by itself, and I like that it can either be soft white light or bright colorful lights (there is also an option to have it fad into both).  So, if next christmas I decide to decorate in more whimsical colors - this wreath still works! Plus it also has a timer option! 

But this year we stuck with a classic, more traditional look.

Here is what you will need to do:
1. Gather supplies: Pre-lit Christmas Wreath, tulle, ribbon/trim, card stock.
2. Wrap the tulle around the wreath.
3. Cut out your letters.  I used my Silhouette cutting machine but you can hand cut them too.  Use a hole punch to punch 2 holes in the top of each letter.
4. String the letters on your trim/ribbon and attach to the wreath.

Here it is sitting with my other Christmas decor:


Need some more Holiday decor ideas?  Check out Your Home with Jill:
QVC’s Jill Bauer hosts the network’s popular show, You’re Home with Jill® and provides fans with simple solutions for their busy lives through innovative products, a library of stress-free DIY projects, and crowd-pleasing recipes. Fans can connect with Jill on Facebook, Twitter, Pinterest, and Instagram @jillbauerqvc.

**Disclosure: I was provided with the Pre-lit Christmas Wreath. However all my project ideas are mine and my opinions are 100% honest. **

Friday, October 24, 2014

Tissue Paper Pumpkins {Tutorial}

I am here with another super easy Halloween Decor!  You might notice that we don't do scary around here.  I am just not into it, but we are still very festive!  I love fall colors and pumpkins that that is what we decorate with! These Tissue Paper Pumpkins are super easy and add such a big bang! 

Here is what you will need:
1. I got the kit from Martha Stewart (available at Michael's) but you totally can make this with orange and green tissue paper!  You need 2 pieces of green paper and 10 pieces of orange.
2. Stack you tissue paper with both pieces of green paper on the top.
3. Accordion fold about 1.5 inch wide folds.  Wrap a wire or tie a string around the middle
4. If you want you can cut the ends to be rounded.  I would do this after you folded it.
5. pull up the green tissue first. and bunch them together to make the steam.  try and pull the green tissue paper up to the center to make it as tall as possible. 
6. Fluff out the orange tissue paper but pulling up to the top and the bottom to make the pumpkin shape. 
7. Tie a string to the wire and hang from your ceiling. 


Tuesday, October 21, 2014

Easy Shabby-Chic Pumpkin Lights Garland

I am teaming up with QVC to make this cute halloween decor! 
Need super easy and cute Halloween decor?  You have come to the right place! 
Here is what you need to do: 

1. Gather supplies: Pumpkin Lights Strand, Fabric scrapes or fat-quarters in fall colors.
2. Rip your fabric into 1.5 inch strips
3. I find it is easier to hang the fabric on the light strand if they are hanging up.  Fold your strips in half and make a loop over the strand.
4. Pull both ends through the loop to "knot" it onto the light strand.
5. Repeat and repeat making a pattern across the light strand.  I put 2 fabric strips in-between the lights. If you want a fuller look you can put more. 


It also looks great for Christmas!

Need some more Holiday decor ideas?  Check out Your Home with Jill:
QVC’s Jill Bauer hosts the network’s popular show, You’re Home with Jill® and provides fans with simple solutions for their busy lives through innovative products, a library of stress-free DIY projects, and crowd-pleasing recipes. Fans can connect with Jill on Facebook, Twitter, Pinterest, and Instagram @jillbauerqvc.

**Disclosure: I was provided with the Pumpkin light strand for free, however all my project ideas are mine and my opinions are 100% honest. **


Monday, June 2, 2014

Take the guess work out of new flooring!

This is a Sponsored post written by me on behalf of Tarkett NA for SocialSpark. All opinions are 100% mine.
Since we moved into our home over 13 years ago I have wanted to redo the floors in our living room.  They are a honey colored hard wood floor.   Here is a current picture of our living room:
It's not terrible but I have always wanted to add a little bit of drama to it, ya know - really make it stand out!  But to take that big leap of faith to make a drastic change when you are not sure how it will turn out, it makes it hard to commit to something.

Tarkett takes the guess work out of flooring.  You can use a design palette that suits your style
My favorites were: 
 photo HushedConversations_zps7e87b590.jpg photo WarmGatherings_zpsdb05f015.jpg


Using RoomVue (Tarkett's online room visualizer) I was able to pick out floor and see what it would look like in the room!  
Here are couple drama options that I created for my living room.  
I have always wanted to go dark with the flooring! 


One of Tarkett's flooring options is FiberFloor.  FiberFloor is made up of woven fiberglass, foam, tough layers that are meant to stand up to the bumps and scratches your family can throw at it... Let me tell ya- with 3 kids, who are merciless when it comes to the floor, that sounds great to me! I cannot tell you how many scratches are in my hard wood floor!  

They also have Luxury Tile floors that offer the ultimate style and performance.  They are also very durible to stand up to lots of wear-and-tear.  With lots of options to choose from and lots of different layouts,  You are sure to find the perfect flooring for your home! 


Check out this video for more info:
Introducing the iSelect® System from Tarkett North America on Vimeo.


Tarkett Flooring has over 10,000 retailers across the country. check out the closest retail locator at: www.tarkettna.com/locator

Stay up to date with Tarkett:


Visit Sponsor's Site

Wednesday, February 12, 2014

Easy Valentine Decor: Window/Mirror art DIY

Bic sent me some of their new window markers to use to decorate for Valentines day!

This a s super fun and easy way to add some holiday decor to your home with out it costing a lot or adding a lot of clutter.  My husband hates clutter, so he also does not like a lot of extra decorations around this house.  But this is perfect! 

Sunday, November 24, 2013

A home tour of Fawnda's House

We finished a bunch of project this spring/summer.  So I thought I would show you some pictures our our house.  I don't have before pictures of everything...but I will show you the ones that I do have.

The living room: 
BEFORE:

After:

Hard to believe it is the same room.  We moved the toys out, got rid of A LOT of furniture, painted the walls (Sherwin-Williams popular gray)  and woodwork (White), and got the hardwood floor refinished.

The Kitchen:
Before:

After:

We painted the walls (popular gray) and painted the cabinets white.


The Dinning room:
(no before pictures) 
We got rid of some furniture and also painted one of the walls (popular gray)  It is right off of the living room.  

The Master bedroom:
(No before pictures)
We painted, and added the bottom paneling.  We got new carpet.  We also added the plantain shutters on the windows.

The boy's room:
We didn't change much in here... mostly just moved furniture around.

The Girl's room:
No changes here. 

The Sun Room and backyard:
We rearranged our furniture out here and it added so much space!  We LOVE this room and spend as much time as we can during spring/summer/fall! 


Here is the front of our home.  
A few years ago we added a stall onto the garage (it only has a 1 car garage when we moved it).  At the same time we painted, added the front porch, and the stone to the house.  

It seems as if we are always working on our house some how... but right now we have all of our projects done...for now!

I hope you enjoyed a little look into our home.  We will be decorating for Christmas after Thanksgiving so I will try to remember to show some pictures then.

Friday, November 15, 2013

Ribbon Light Garland and a Pinterest Party (with Michaels Craft Stores!)

Thank you to Michael's Craft Stores for sponsoring this Pinterest Party! 

Michael's Craft Stores is challenging us all to not just pin it - but to MAKE IT!   We spend hours on Pinterest pinning things to make and then never get around to it.  So, I got some of my girl friends together and we had us a little Pinterest craft party! 
Michael's supplied all the party accessories... I have a confession:  I got the box of party supplies in the mail and my kids saw the balloons and they never made it to the party.  I mean balloon are hours of entertainment for my kids! 

Did you know that Michael's makes custom party accessories?  Yep- Michaels offers customizable party supplies like cups, napkins and balloons available online to personalize your event.  How fun is that?!
I pinned this picture 2 years ago... perfect for this challenge!  
 The original post is from Whitney Caroline Designs.
It looks like there was a slide show that maybe showed how she made it but it has been removed so I included directions below on how we made it.  

I was having such a fun time at the party I forgot to take many pictures... bad blogger!  But here is a run down of what happened:
I invited some friends over to craft with me.  Since I was providing the crafting supplies I ask everyone to bring a snack to share.  It was great fun just sitting and crafting and chatting!  A much needed girls night!  

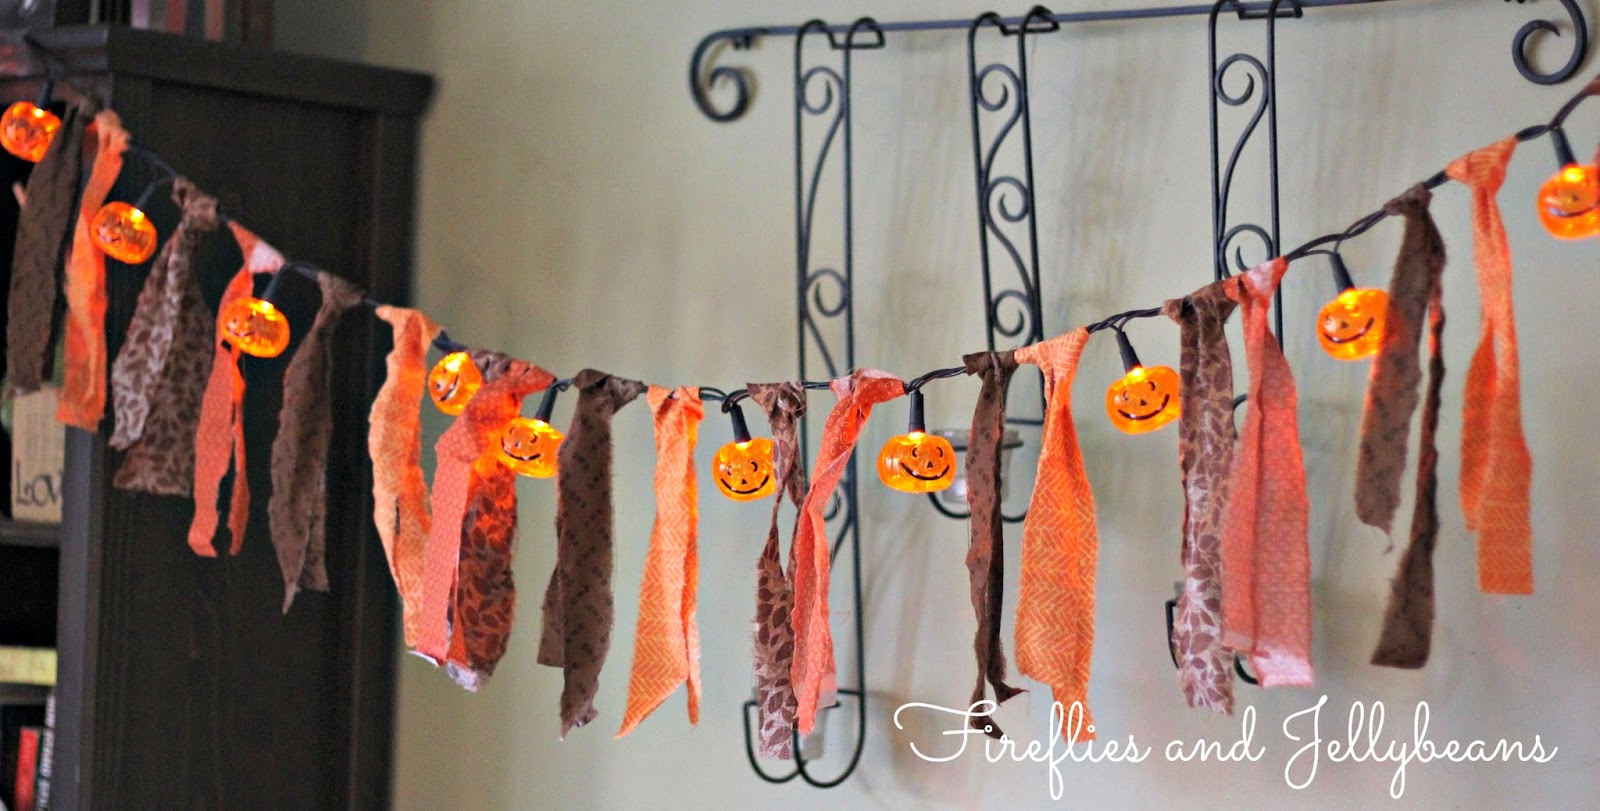
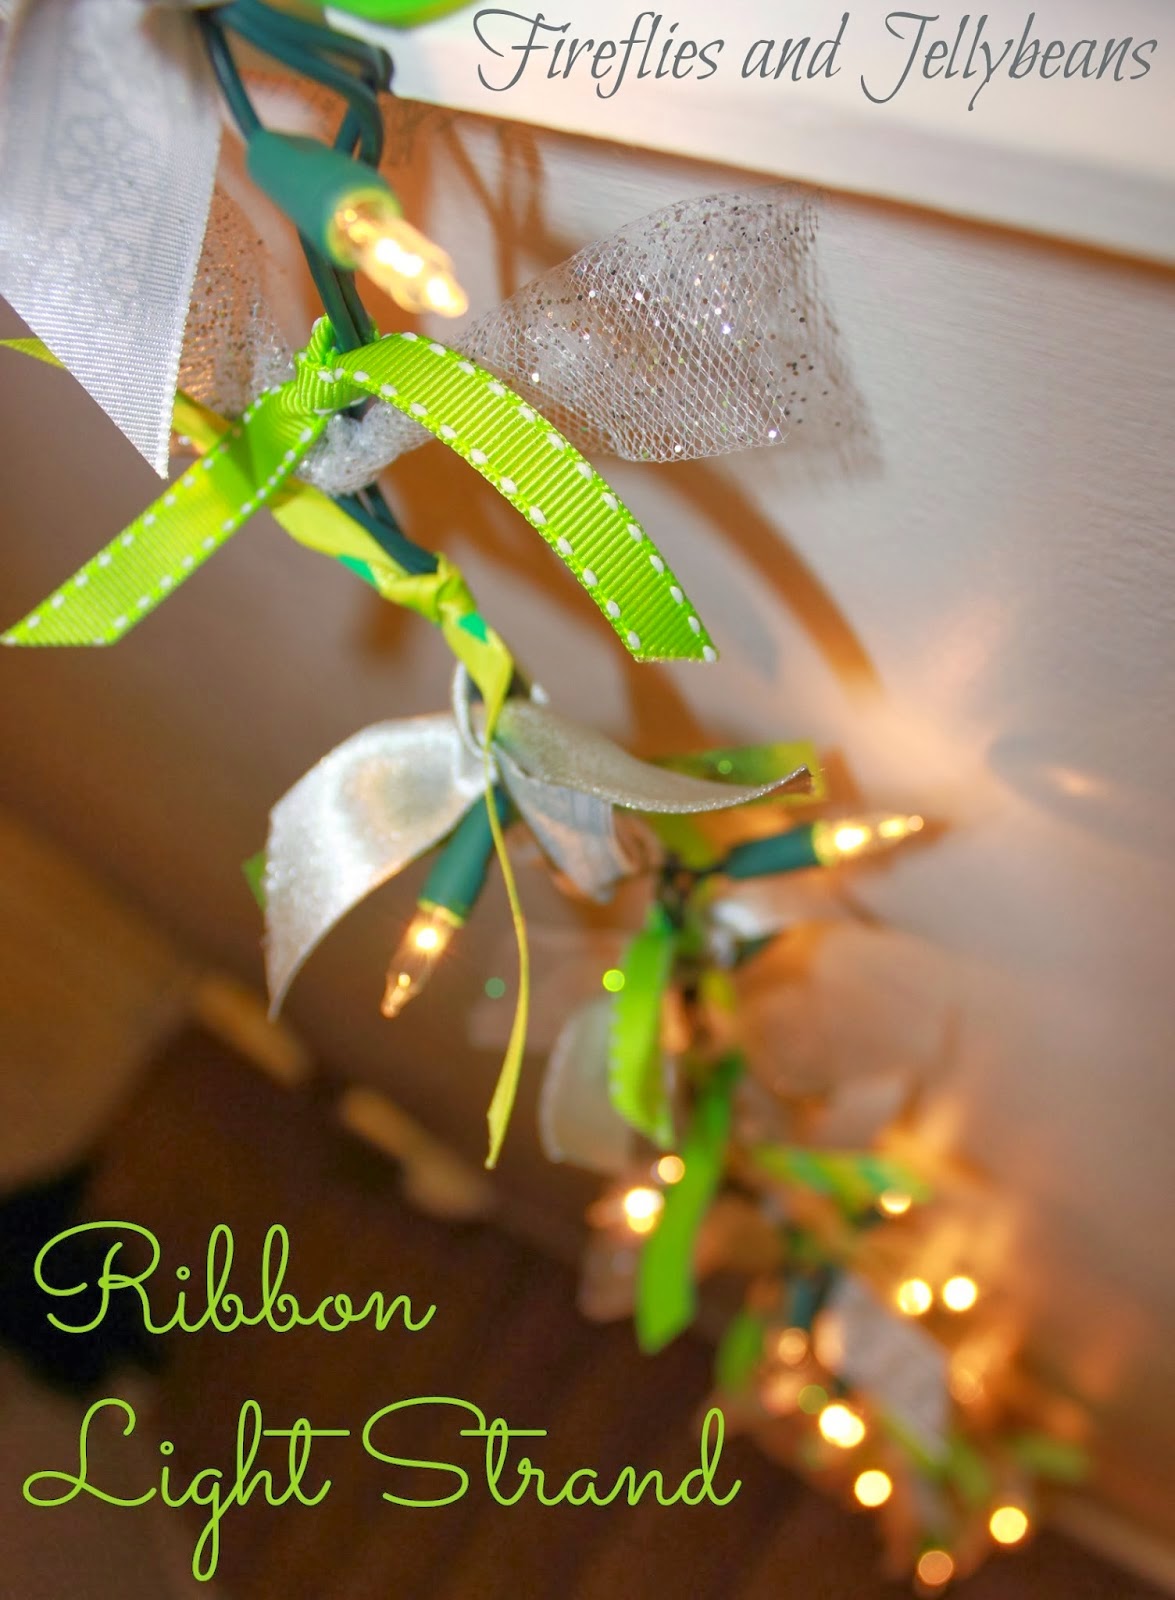
Here is our version of the Ribbon Light Strand.  
We added some glitter tulle to it and it added so much!  It just glitters in the light! 

Here is what you will need:
1 strand of lights
a bunch of ribbons and tulle.
(all my supplies were bought at Michael's!)

I did some math for you. 
We figured that 2 ribbons per light was good.  Each ribbon had to be at least 6 inches long in order to tie a good knot.  For 100 light strand, 200 ribbons at 6 inches each is 1200 inches which is 33 1/3 yards of ribbon...so you want to make sure you have at least 34 yards of ribbon...better make it 35 just to be safe. 
The original ribbon garland from the Pinned picture above, I think, has 4 ribbons per light so that would mean you would need 70 yards of ribbon per strand. But 2 ribbons per stand looks great and full enough! 


now you...cut out you ribbons!
and then you tie and tie and tie and tie.... 2 ribbons between each light.  If you want to short-cut it you can just do 1 ribbon in between the lights... then you would only need 17 yards of ribbon.  Some of the ladies at the party did only 1 ribbon between light and it still looks beautiful so go with what you want! 


This garland looks good ever where... get ready for picture overload! 
Here is one of the other garlands that was made at our craft night.  
She is using it around her centerpiece on her table.  Just simple mason jars and some lights make this an AMAZING centerpiece! 


and now back to my garland!

Follow the hashtag #MPinterestParty to see how others are making their pins a reality

The Michaels Décor Guide has tons of ideas and projects to make spreading the holiday cheer throughout your house easy. Navigate through the online version, download a copy, or pick up one at your local Michaels!

Disclaimer: Michael's provided a gift card for the craft supplies... all my opinions are 100% mine! 

Content Ad