Showing posts with label Fashion. Show all posts

Monday, August 11, 2014

Mother-Daughter Ombre Skirts made from T-shirts {Tutorial!)

Thank you to ILTC and Blueprint Social for sponsoring this post
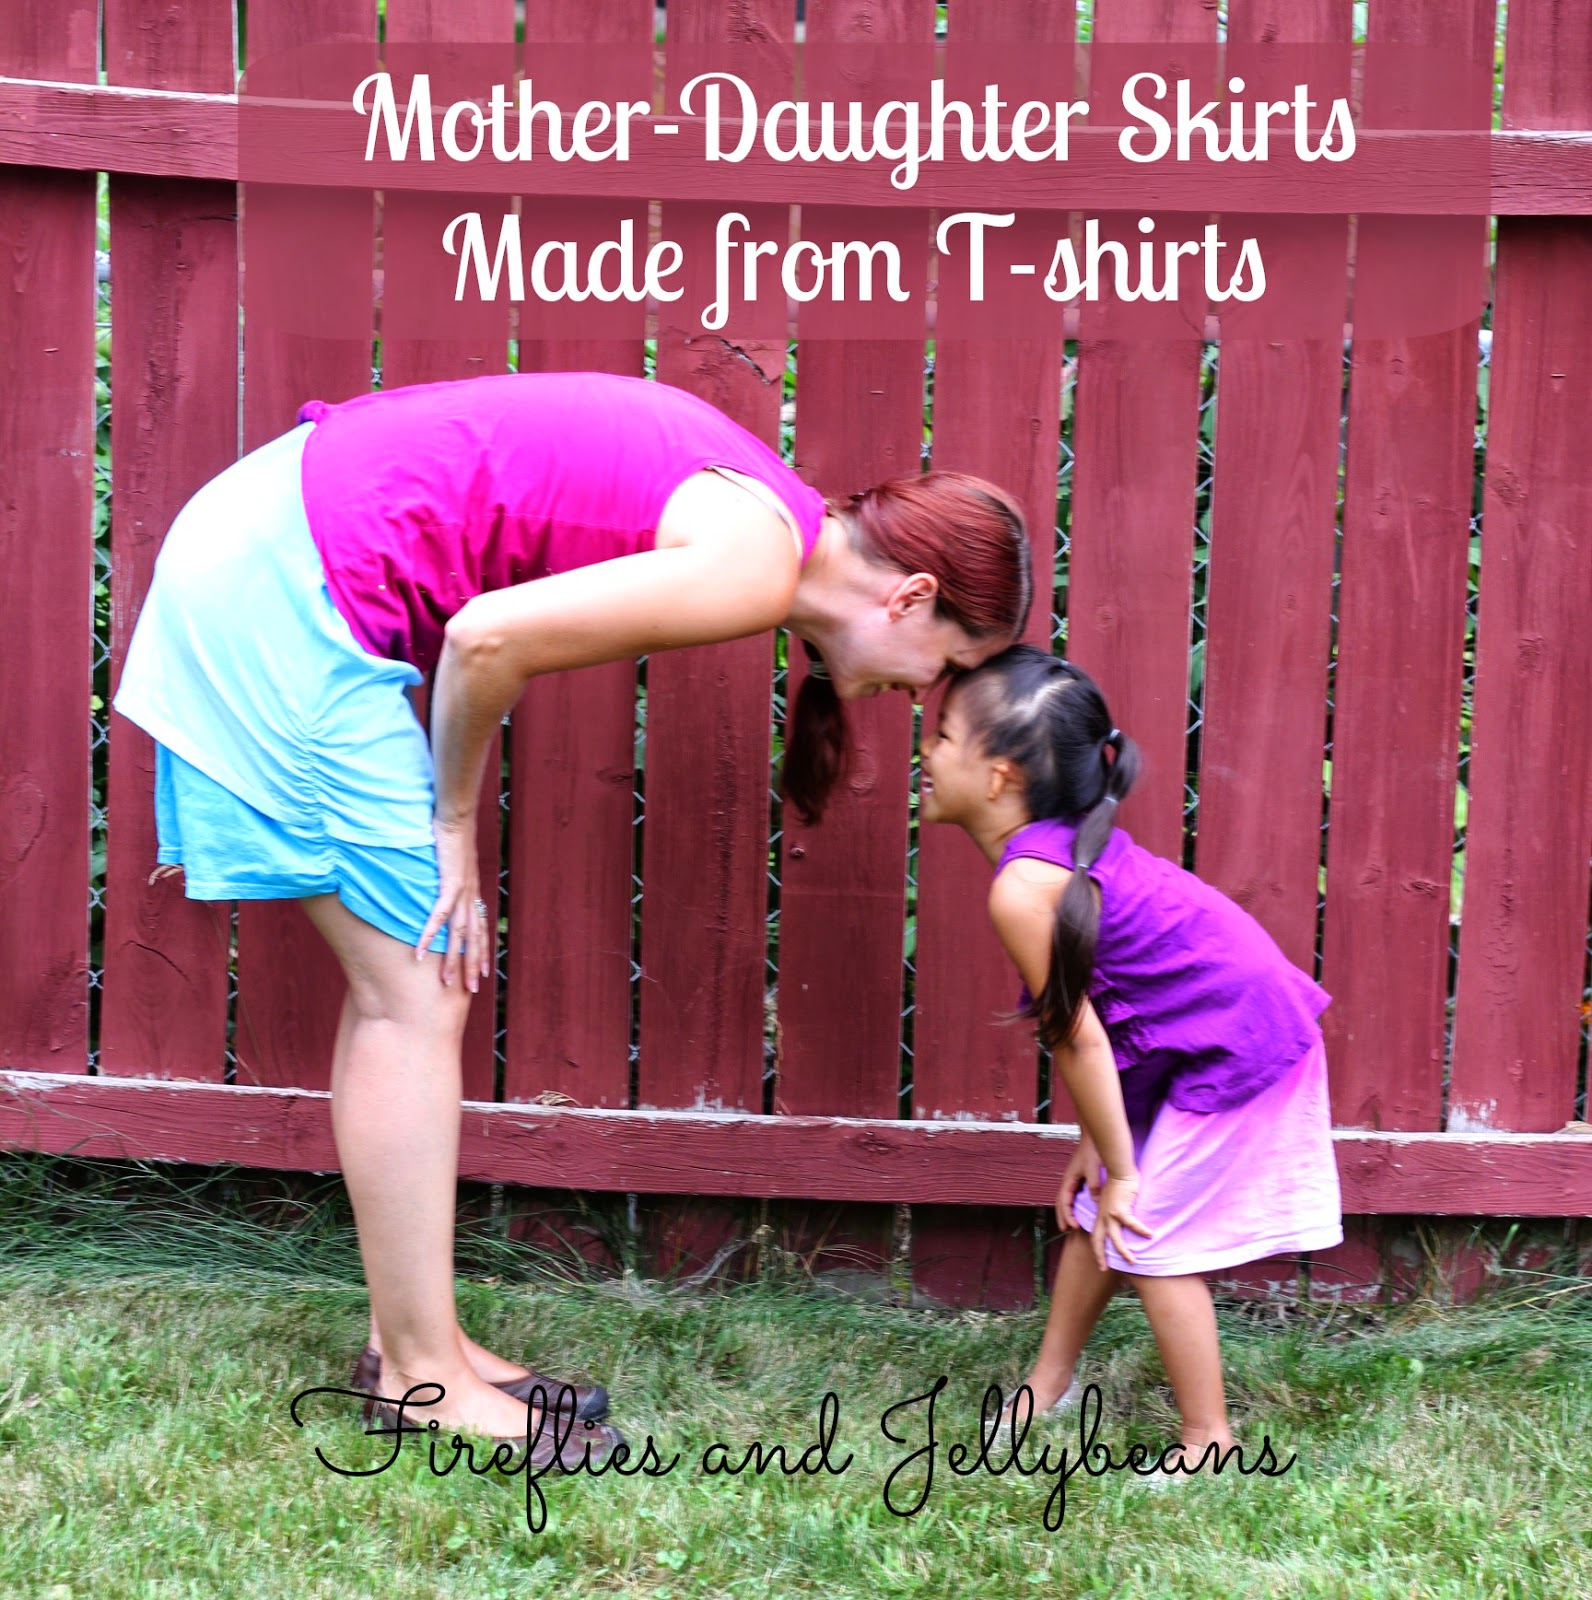
I am so excited to participate in Tulip's Tie Dye Your Summer!  Even though summer almost over these skirts are so easy and fun to make and would make a great Back-to-School project as well!  Tulip One-Step Tie-Dye kits are so easy to use!  They come with everything you need!  Just add water to the pre-made bottle and you are all set.  The dyes are permanent and color-fast, so they won't fade in the wash! Tulip One-Step Tie-Dye is America's Favorite Tie Dye! Perfect for multi-color projects,  group activities and family fun!

Here is how to make your own skirt!
For the "mom" version

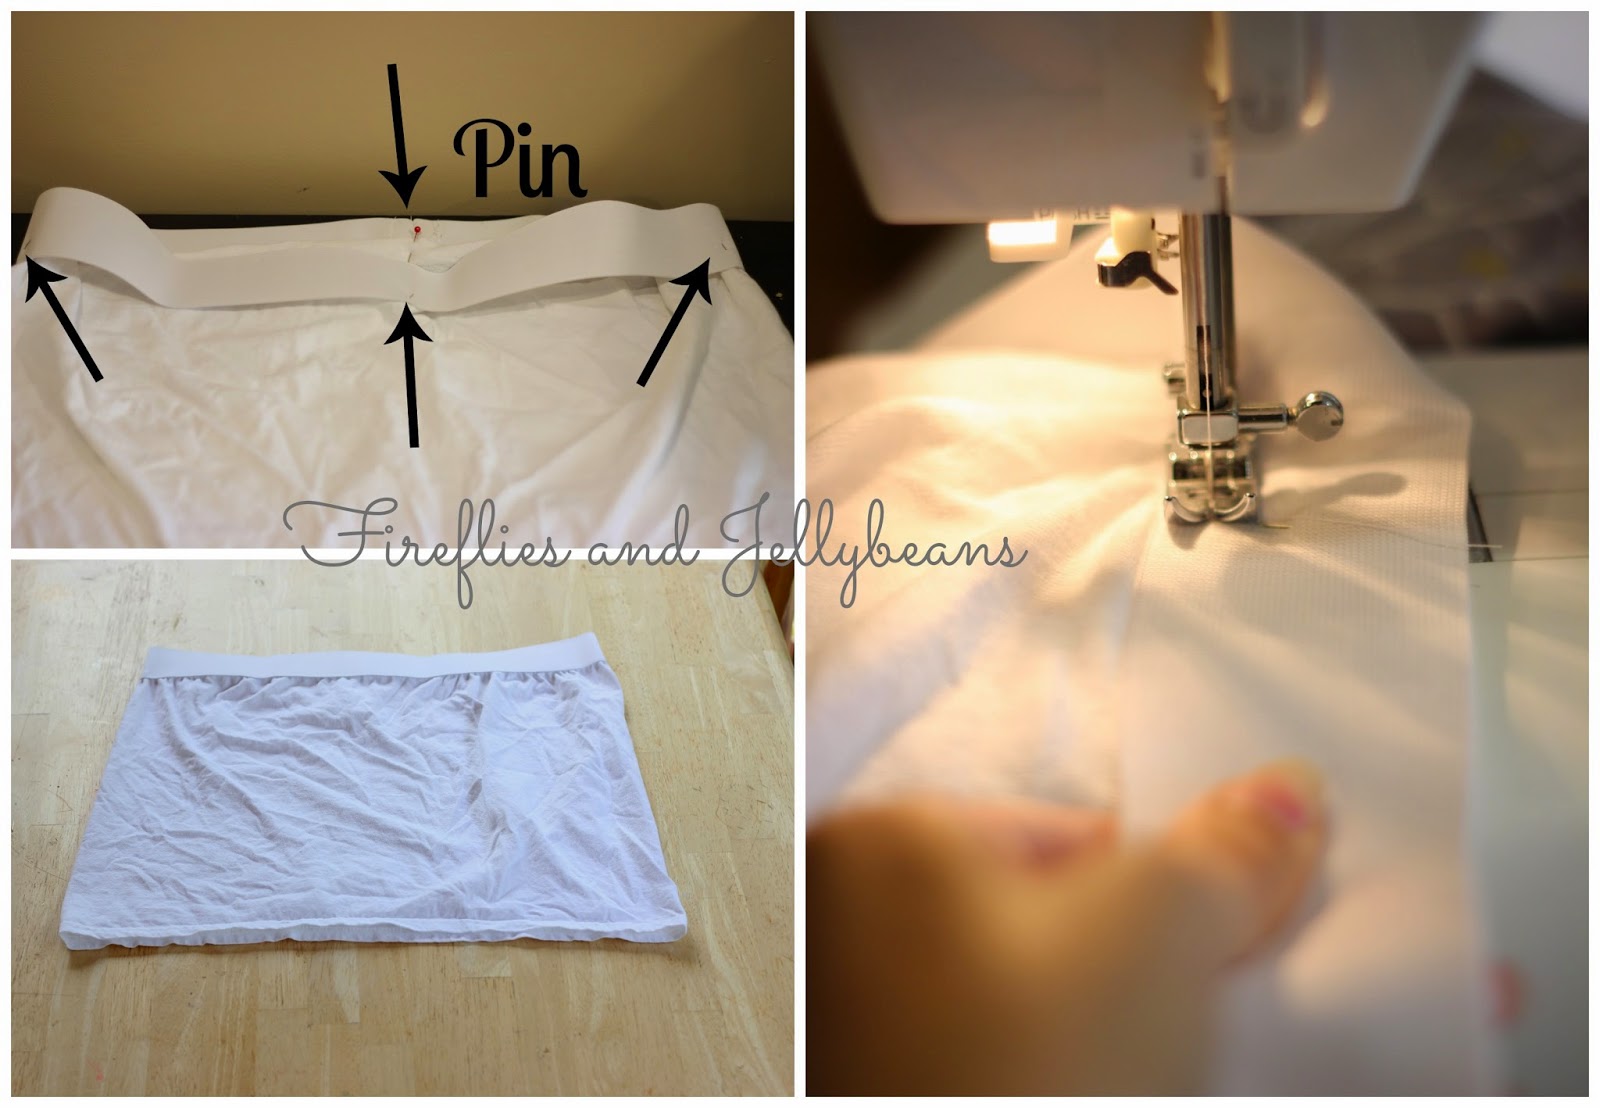
1. You will need a Large t-shirt (I wear a medium skirt) 2" elastic, Tulip One-Step Tie Dye Kit.
2. Cut you t-shirt right under the sleeves. (I used 2 shirts to make the length longer so you can also cut 2 if you want)
3. Measure around your waist and add 1". This is how long you should cut your elastic. Sew the elastic to make a loop with a 1/2 inch seam.
4. To finish off the edges of the elastic fold the unfinished edges out and use a zig-zag stitch to finish them off.

5. Your Elastic will be smaller then the top of the skirt - that is good.  Pin your elastic on each side and in the middle of the front and back with some slack in the middle of each pin.  
6. As you sew on the elastic you want to stretch it as you sew.  This will "gather" the skirt for you.  Use the pins as a guild on how much to stretch it - you want to pull on the elastic and the fabric should be taunt but not stretched. 

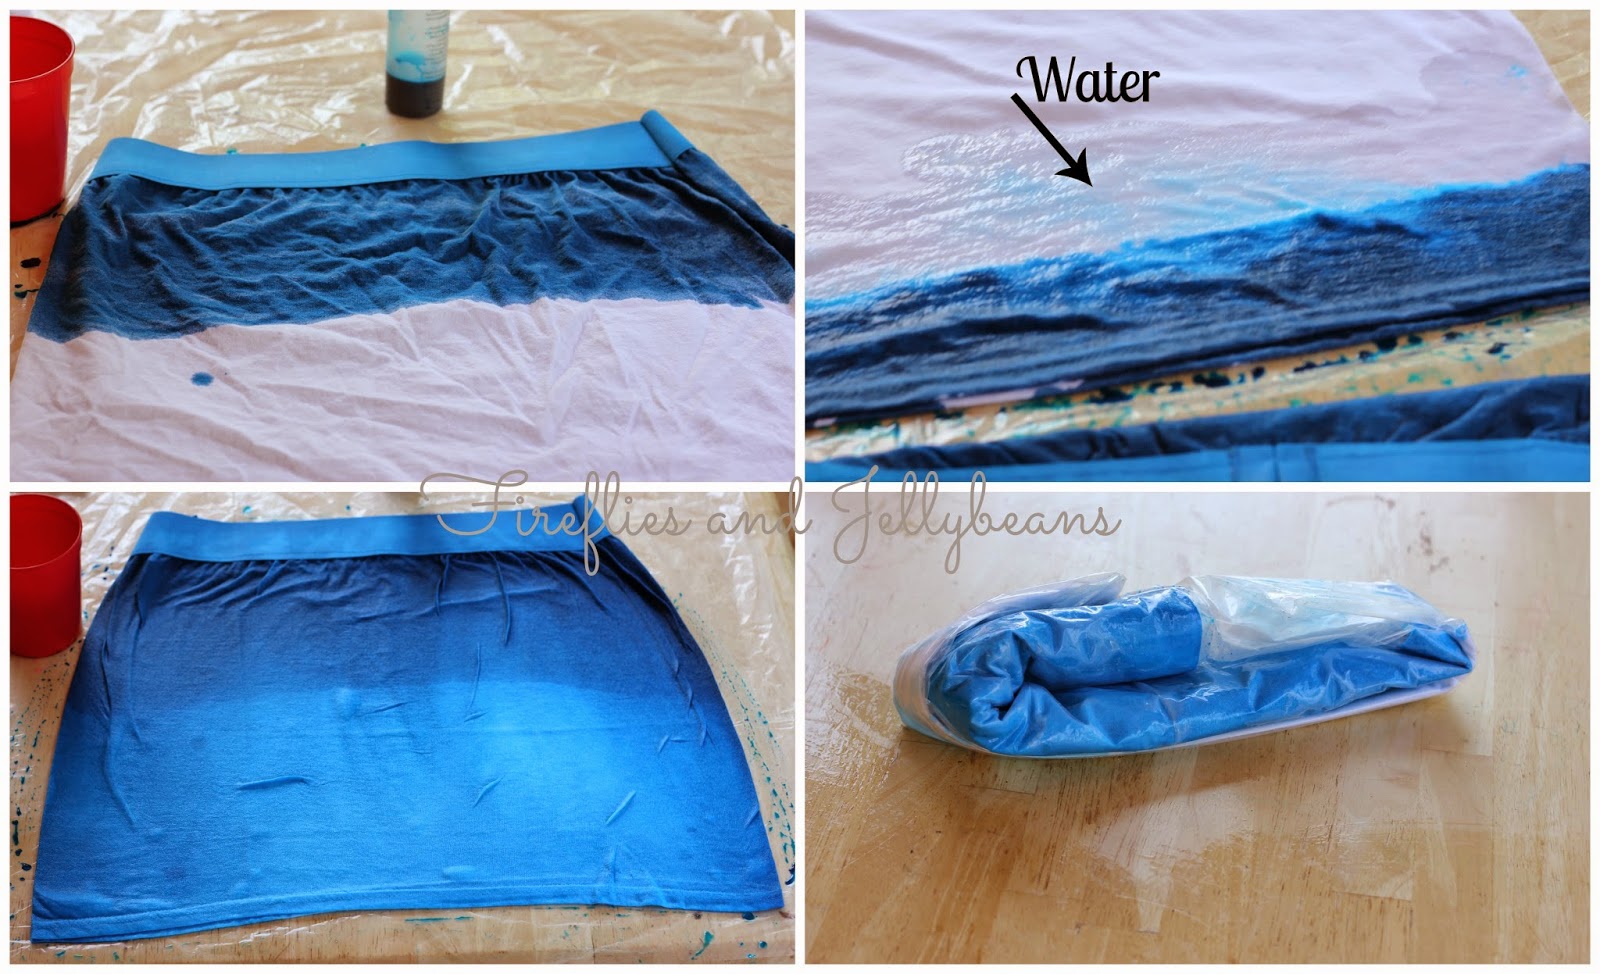
 Now we are going to Dye the Skirt.  Use gloves so that your hands wont get dyes too, and you will probably want an apron or use your paint clothes because these dyes are permeant!  
7. Set out a big piece of plastic on your table.  Fill up the pre-made Dye bottle with warm water to the fill line and shack until it is mixed well.  Squirt a lot of dye on the top of the skirt.  
8. Pout some water on the line of the dye.
9. Use your (gloved) hands to draw the dye down the skirt.  
10. Wrap it up in the plastic and let it set for at least 6-8 hours.   

11. I dyed 2 pieces of fabric to make my length longer.  I dyed my separately.  I just inserted the bottom layer into the skirt for the length I wanted and sewed around it with a zig-zag stitch.  
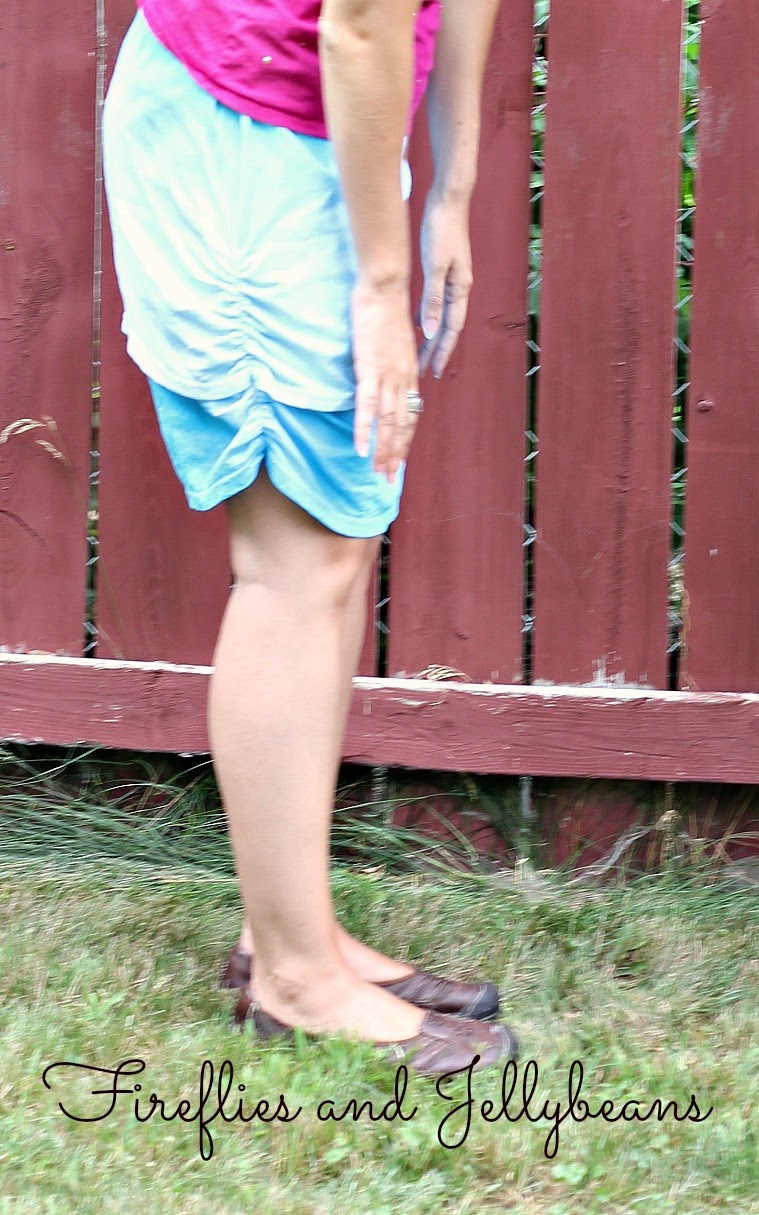
12. To add the gathers on the sides I cut a 10 inch piece of 1" elastic.  and lined it up on the side of the skirt.  
13. Starting at the bottom sew a couple stitches (zig-zag) to anchor it and the pull on the elastic (but not the fabric) to stretch it as you sew.  This will create the gathers. 

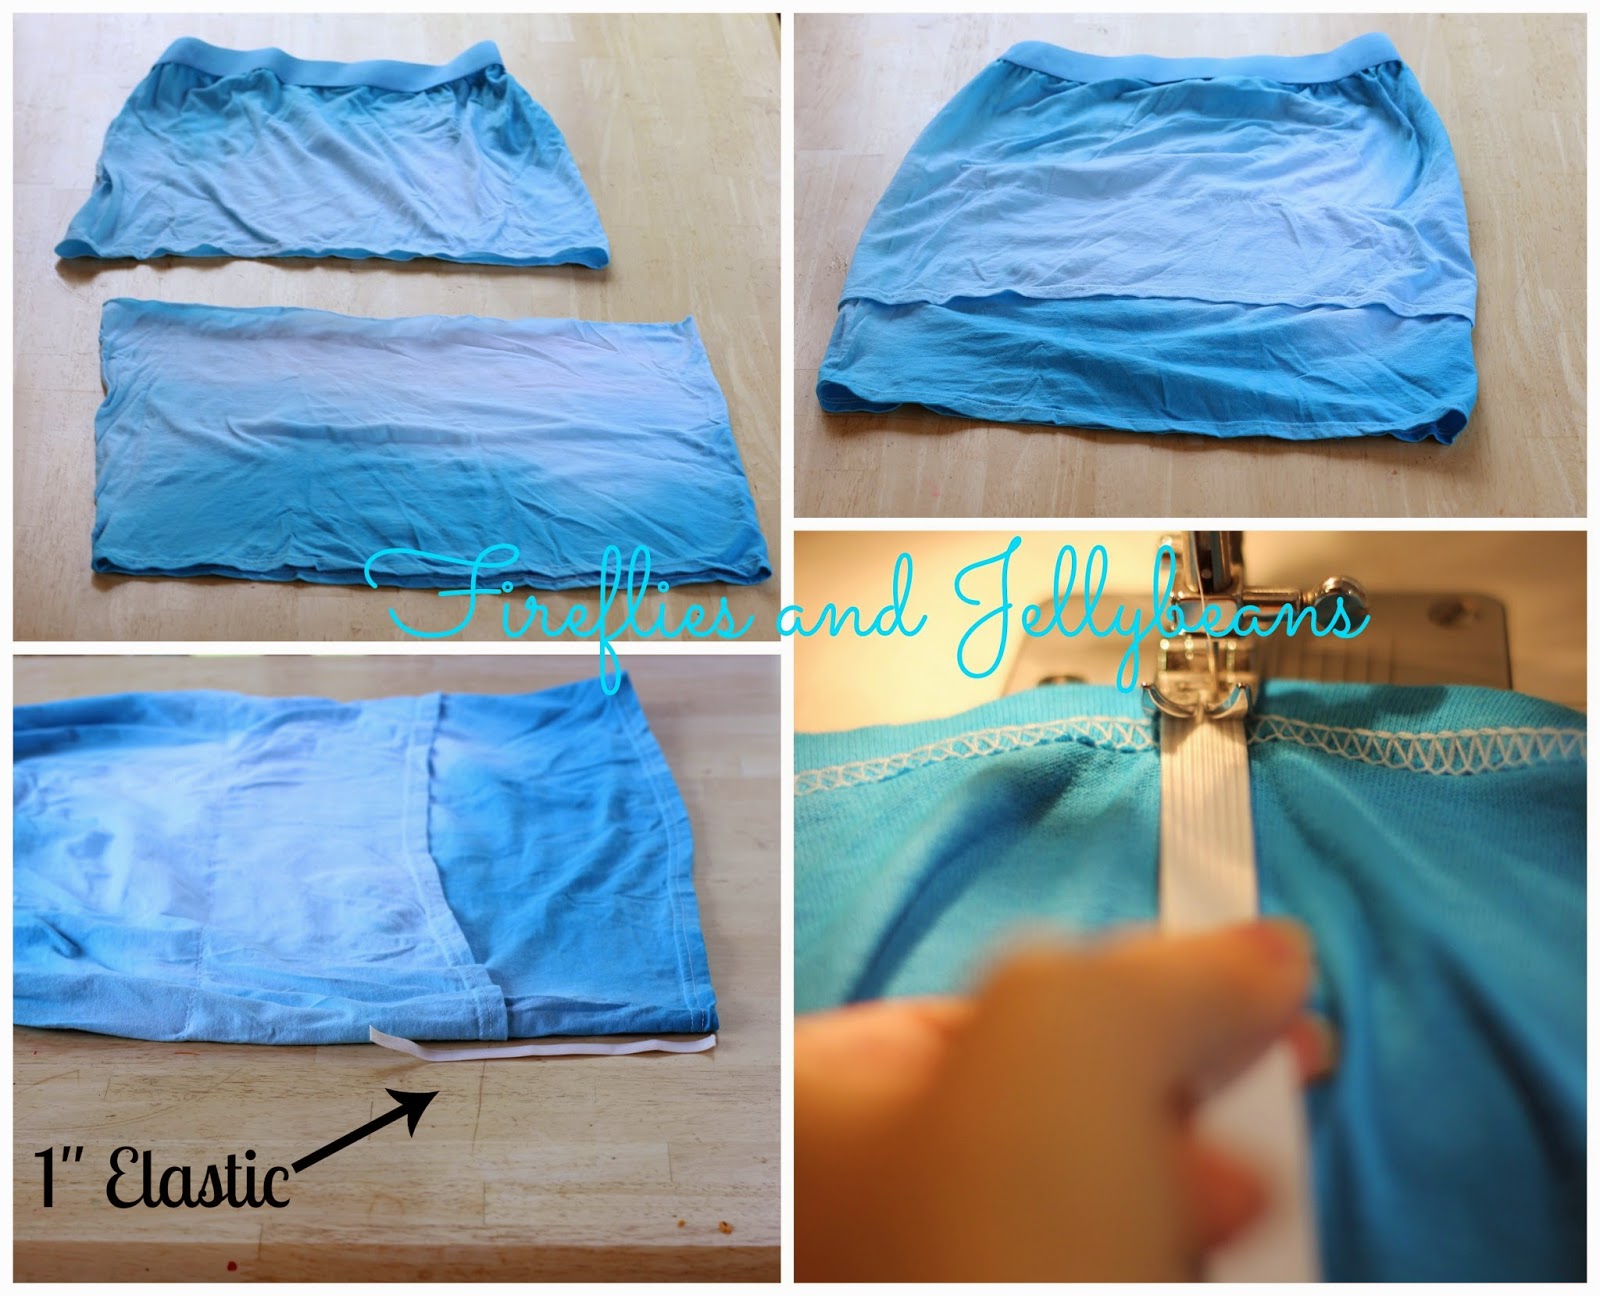
See how it adds the gather detail on the sides?


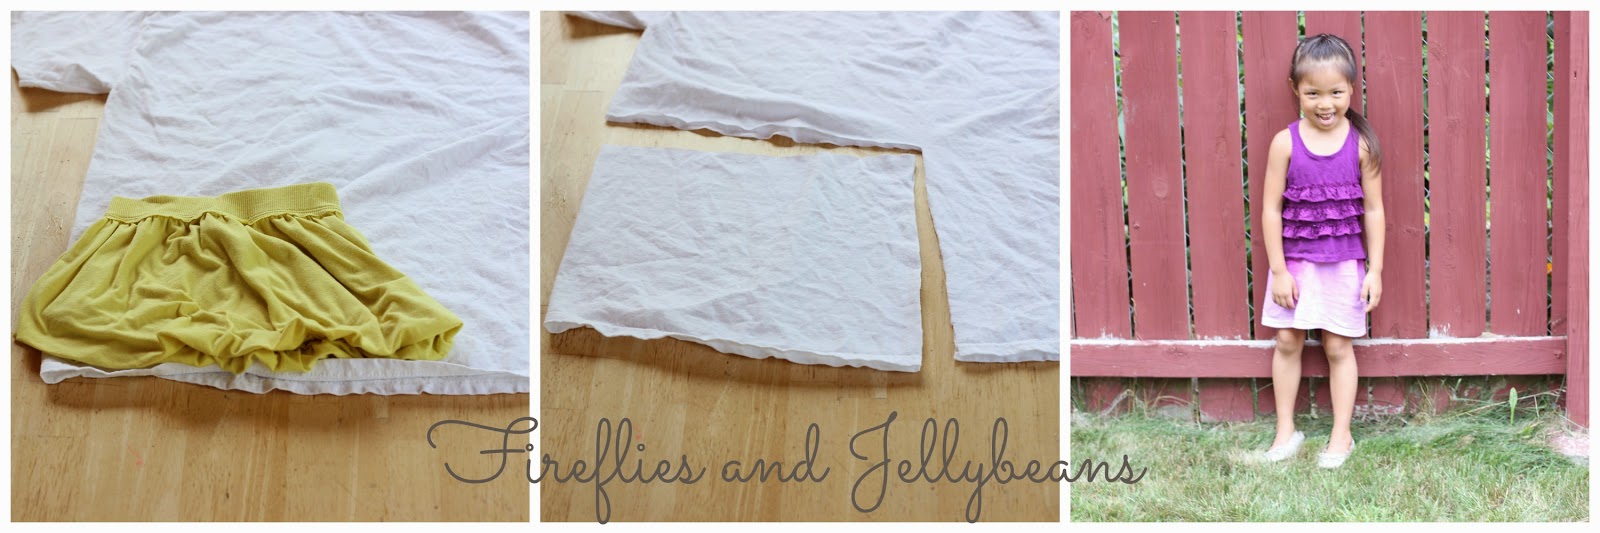
To make my daughter's skirt- I used a skirt she already had to help with the sizing.  I cut out a rectangle out of the t-shirt and sewed up the seam (I only had one since I cut it on the fold).  I attached the 2" elastic the same way as I did my skirt and also dyed it the same way too.  I did not add the second layer since it was already long enough.   

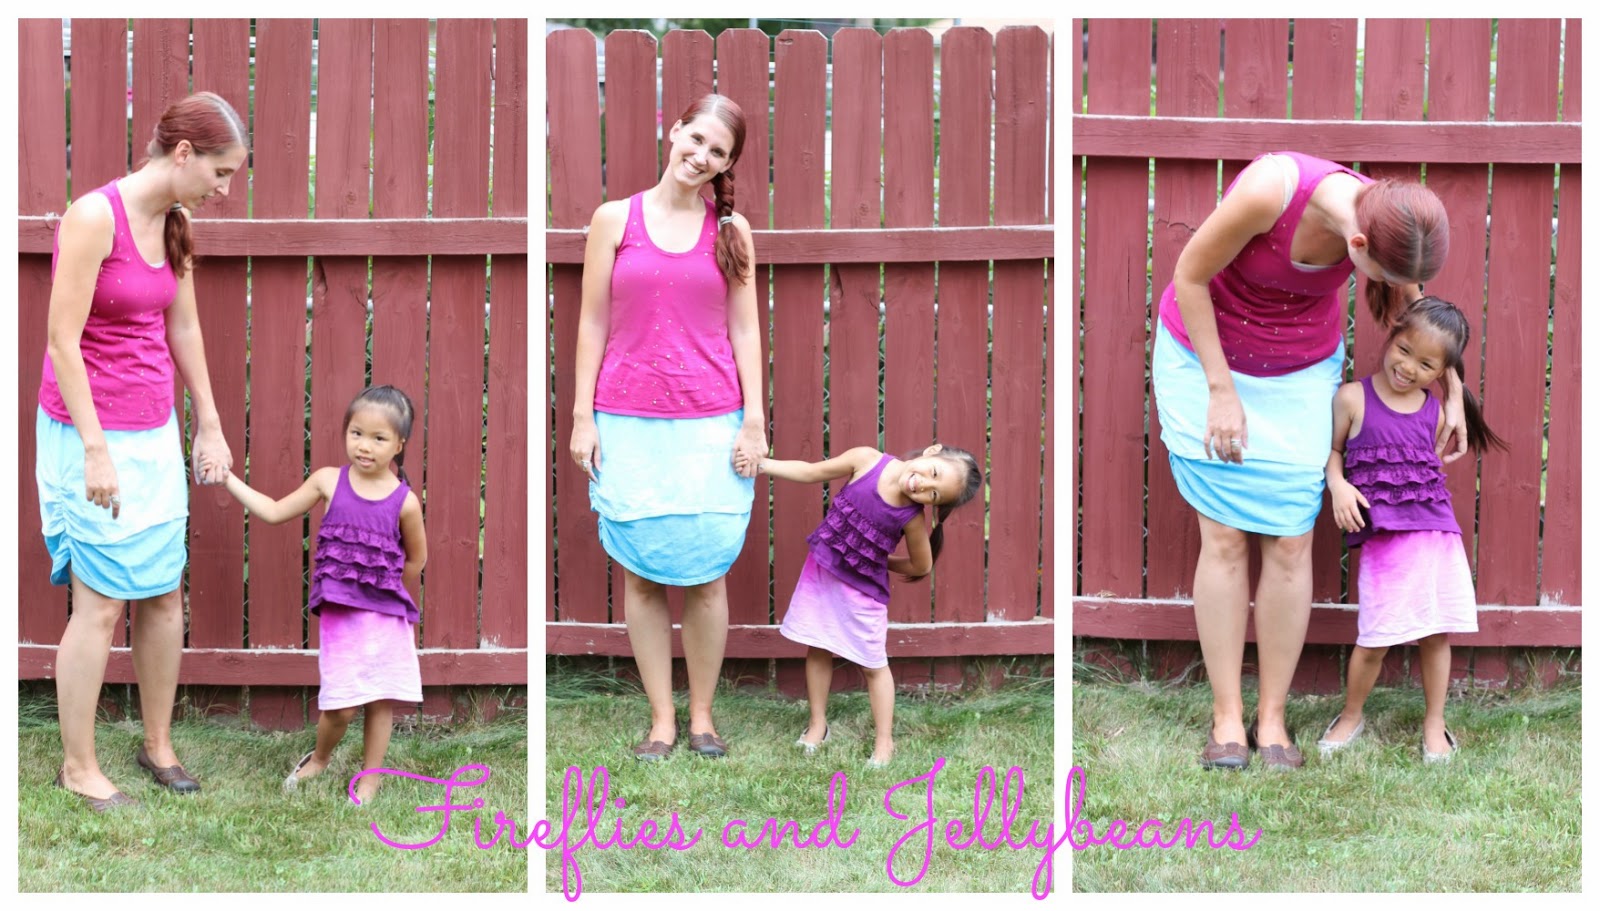
This was a super fun project and my daughter always loves it when I make stuff for her! 

Check out other fun stuff you can make with Tulip:


You can find Tulip:


More fun Tie-Dye Projects! 

Tuesday, July 9, 2013

Easy DIY Boutique Styled Hair Clips


You can make all of the above hair clips really fast, easy and cheap!  
My Sunshine Shoppes sells Wholesale Craft Supplies at AMAZINGLY low prices!  All of the supplies used to make these clips came from My Sunshine Shoppe!

Anyone can make these flowers!  My Sunshine Shoppe makes it so easy!  I will break down some of the clips for you and tell you what you need and how much it ended up costing you to put together. 
(Note: The alligator clip come in a pack of 12 for $1.50 and the felt circles come in a pack of 10 for $0.75 so I divided the price to reflect just one piece for each flower.  I also did not include shipping rates)

Flower #1
Total cost: $1.88

Step 1; Glue your flowers together

Step 2: place the felt circle in the clip and put hot glue on it.
Step 3. Glue it to the back of the flower.

Step 4: Wear it! 

The other flowers are just a variation of the 1st flower so I am not going to show you all the steps... but I will show all the supplies and break down the price. 

Flower #2


Here is a flower Headband!  

Flower #3 
Total Cost: $1.55

Step 1: Place Hot Glue on the headband where you want your flowers to go.
Step 2: Place Flower on the glue.
Step 3: Finish it off by placing 2 felt circles over the band using hot glue. 
Super easy!

Flower #3


The super cool thing about their headbands is that they have a tab in them to put your clips through so you can switch out your flowers as needed! 

Wouldn't it be so much fun to get a bunch of ladies together and have a flower making party?  

Now my daughter has a flower to match every outfit!  
Shhhh- don't tell her that I steal them for myself sometimes! :) 

Disclosure:  This post is written for Sunshine Shoppes is a sponsored post.  All opinions are 100% honest! 

Monday, January 23, 2012

Tie Belt Tutorial

Today I have a SUPER easy project... It will take less then 15 minutes to make!  A cute tie belt.  

Here is what you need:
A tie {I grabbed mine from my hubby... yes, I asked first!}
A set of D Rings {found at the fabric store in the notions section}
Sewing machine with tread, scissors, etc...

I measured around my waist and decided to cut a couple inches of the SMALL side of the tie.  I didn't want it to hang down to far.    This is totally optional.
 Fold over the end of the tie 2 times so that you have a finish edge and make a loop for your set of D rings (you should have two of them.)and sew as close to the rings as possible.  I sewed a couple of times just to reinforce the seam.  {Might i suggest using a coordinating color Thead too!  White was already loaded in my machine so that is what I went with!}
DONE! 

It is such a fun accessory!

Linking to:


Todays Creative Blog
Home Stories A2Z

Monday, January 16, 2012

Beauty Resolutions: No more Pony-Tail! Easy fun Hairdos! {#CleverBeauty, #spon}


Thanks to Walgreens for underwriting this post. I was paid as a member of the Clever Girls Collective, but the content is all mine. Visit http://www.discoverbeautywithin.com/.

This year I am going to get out of my mom-ponytail rut I am in and start doing so fun hair-dos!  My beauty resolution is to pay more attention to my hair! This is going to mean a little more effort on my part, but I figured if I had a couple go-to hairdos it would be easier. 

Of course I went to the web for inspiration and here are 3 easy hairdo that look great!  All three hairdos use products that you may already have or could get at a drug store like Walgreens!  They are also great hair dos for the day after you wash your hair!

I wanted a verity of hairdos... some up and some down.  I picked tutorials that are easy to follow and work on several different hair types.

#1
The first one is the Elegant Half up.  This one just uses bobby pins.
Here is my version! It still looks great with longer and wavy hair!

#2
The second one is the One Sided Braid.  All you need is an elastic band.  I love braids right now!  
Here is my version:
I like that it is simple, but yet the braid add a little bit of interest.

#3
The third one is for Classy Pigtails.  All you need are elastic bands and boobypins.  Oh, how I love the pigtail trend!  
Here is my version.
I used a headband and I braided my hair instead of leaving it as pigtails... see above! :)
I have more fun hairdos on my Pinterest fashion board, feel free to check out (and follow me too if you want!).

So, do you have an BEAUTY resolutions this year?   Do you have any favorite Hairdos that you want to share?  I love to hear your comments!  Talk to me!

Thursday, December 8, 2011

Natural Eye Make-up tips and Tricks


Thanks to L'Oreal for sponsoring my post about my favorite beauty looks, tips and tricks! Check out Makeup.com for beauty advice from the experts.

I wanted a nice natural look for my everyday make-up.  I used this picture as inspiration to create a nice natural eye-make up.  I like to wear make-up to looks like I am not wearing make-up.  I am by no means a make-up expert... but I tired! : ) 
{source} 

Here is my naked-eye... no make-up
First I applied my liquid eye liner BEFORE I put on my eye shadow.  I want the eye-liner to be subtle.
To apply the eyeshadow, I used this picture as a guide to help me know where to put what color.
{source}

I used my blusher as eye-shadow  and applied the colors in the order of the above picture.
{by using my blusher colors I know that it will blend nicely with the rest of my face.  It gives my whole face a nice natural warm glow.  Plus it cuts down on the # of make-up items I have too!}

And I love thick eyelashes so I used Maybelline's One-by-One Volume Express Mascara.
This mascara is wonderful at giving me BIG and THICK lashes! I love it!
Here is the end result... I know that it is not as dramatic as the top photo... but it only took me a couple of minutes and very little make-up to get this nice everyday look!


Here are some more daring eye make-up looks that I would love to show off at a fancy holiday party! 
{source}


What kind of make-up tips and tricks do you have for us?

I was selected for this sponsorship by the Clever Girls Collective. Click here to learn more about Makeup.com or become a Facebook fan by clicking here.


Content Ad