Showing posts with label Christmas. Show all posts

Thursday, November 12, 2015

Easy Shell Christmas Ornament (15 minute craft!)


So, glad to be joining in Craft Lighting this month again!  This time the theme is Holidays! 
Growing up my family always got or made ornaments that had to do with what the past year held.  So, I wanted to carry that on with my kids.  A few years ago we went to South Carolina (to visit my sister) and collect a bunch of shells from the beach.  So at home we picked out some shells and decorated them for our tree. 

It is super easy to do! 
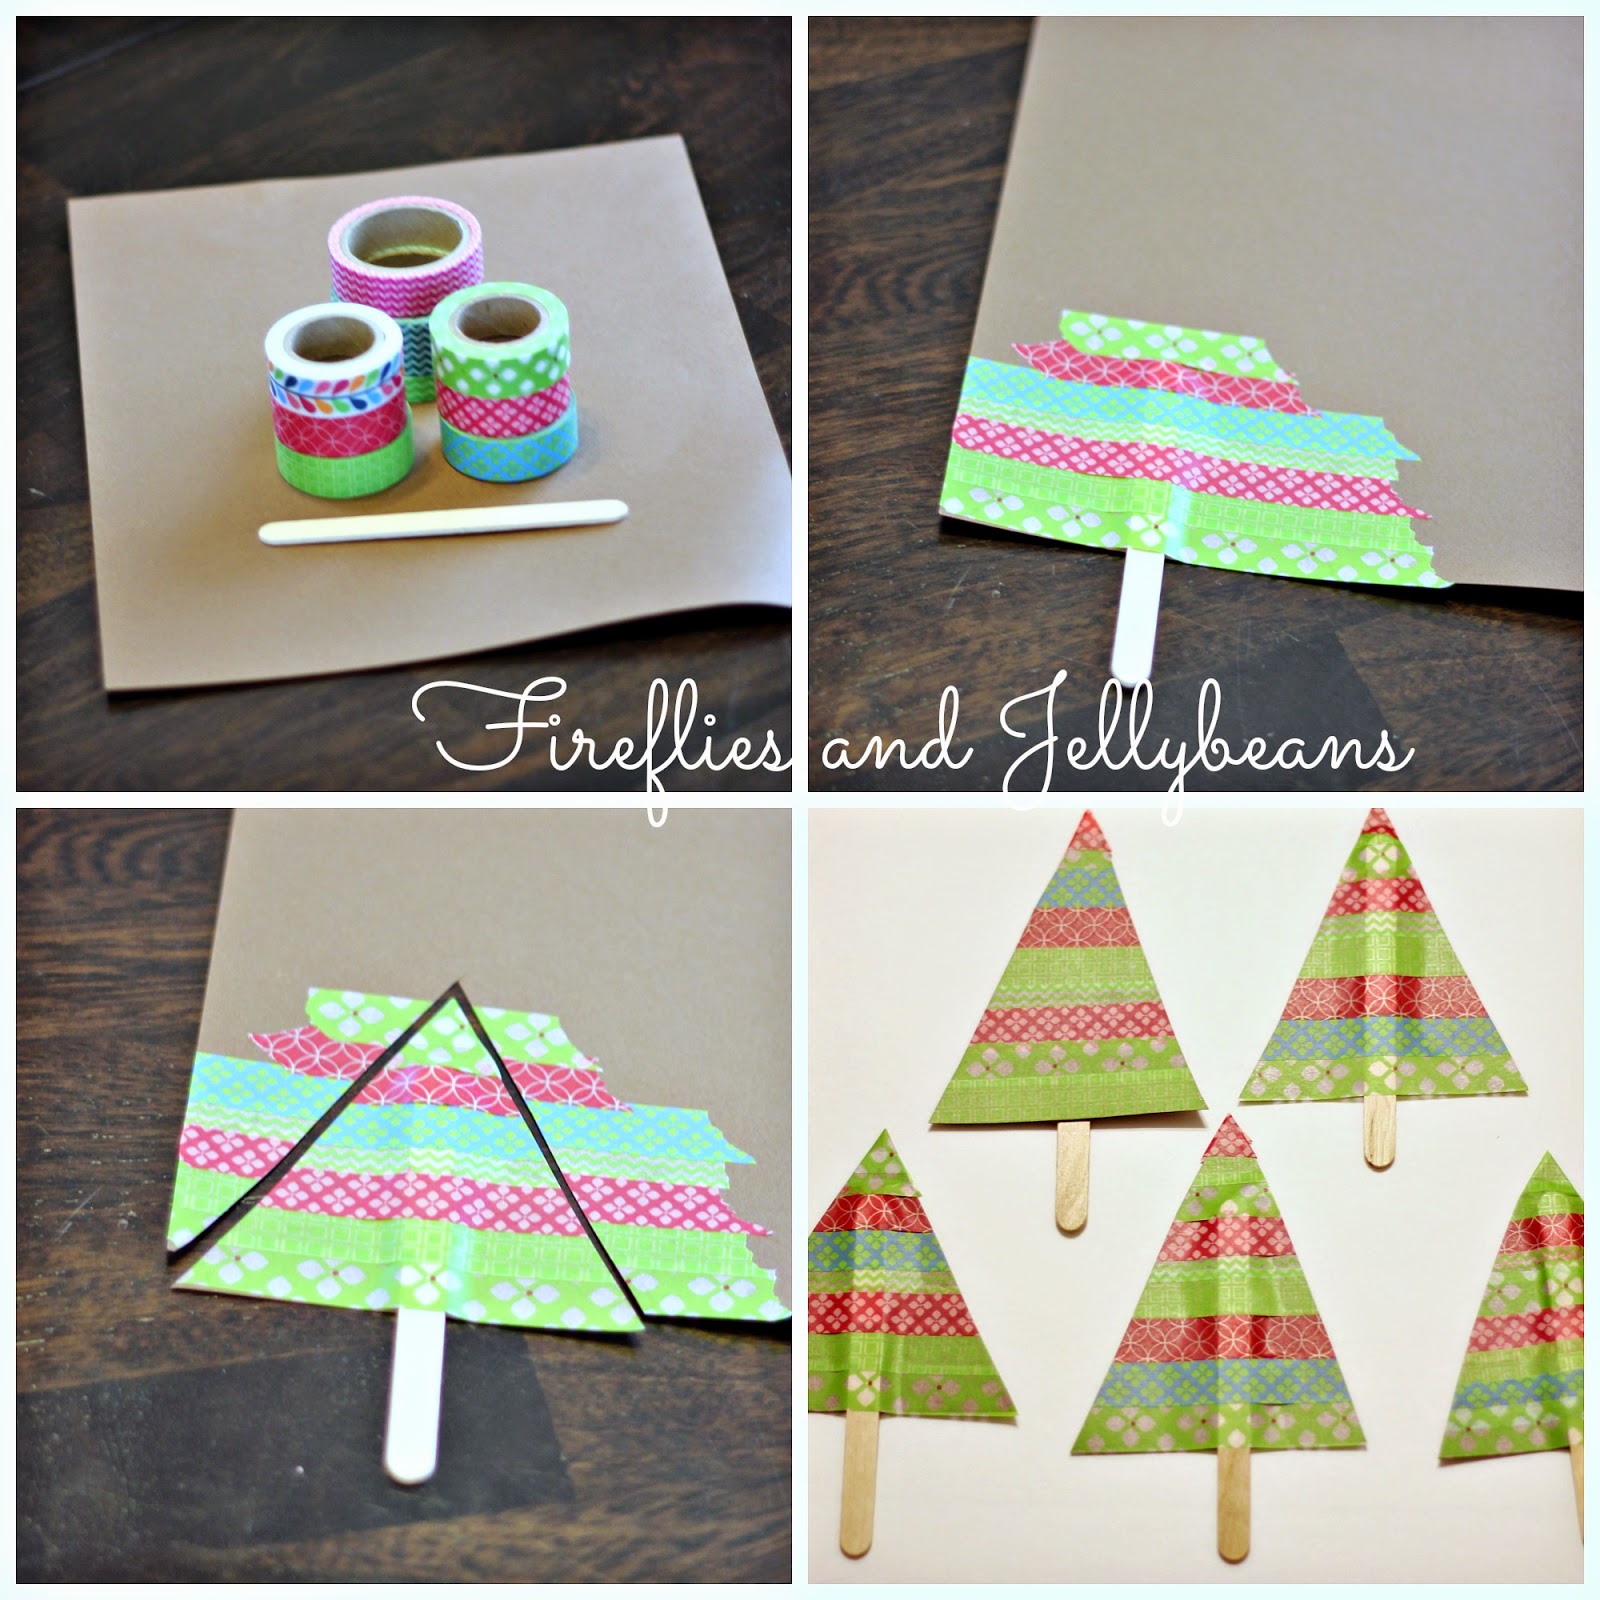
1. Select your shells.  I liked to find ones with holes in them already to give a place to tie a ribbon but it is not necessary.
2. Paint the shells with either glitter paint or any color that matches your docore.  We liked gold/ glittler red and silver.   Get the kids involved! 

3. Let dry and attach the ribbon.  If there is not a hole just use hot glue! 
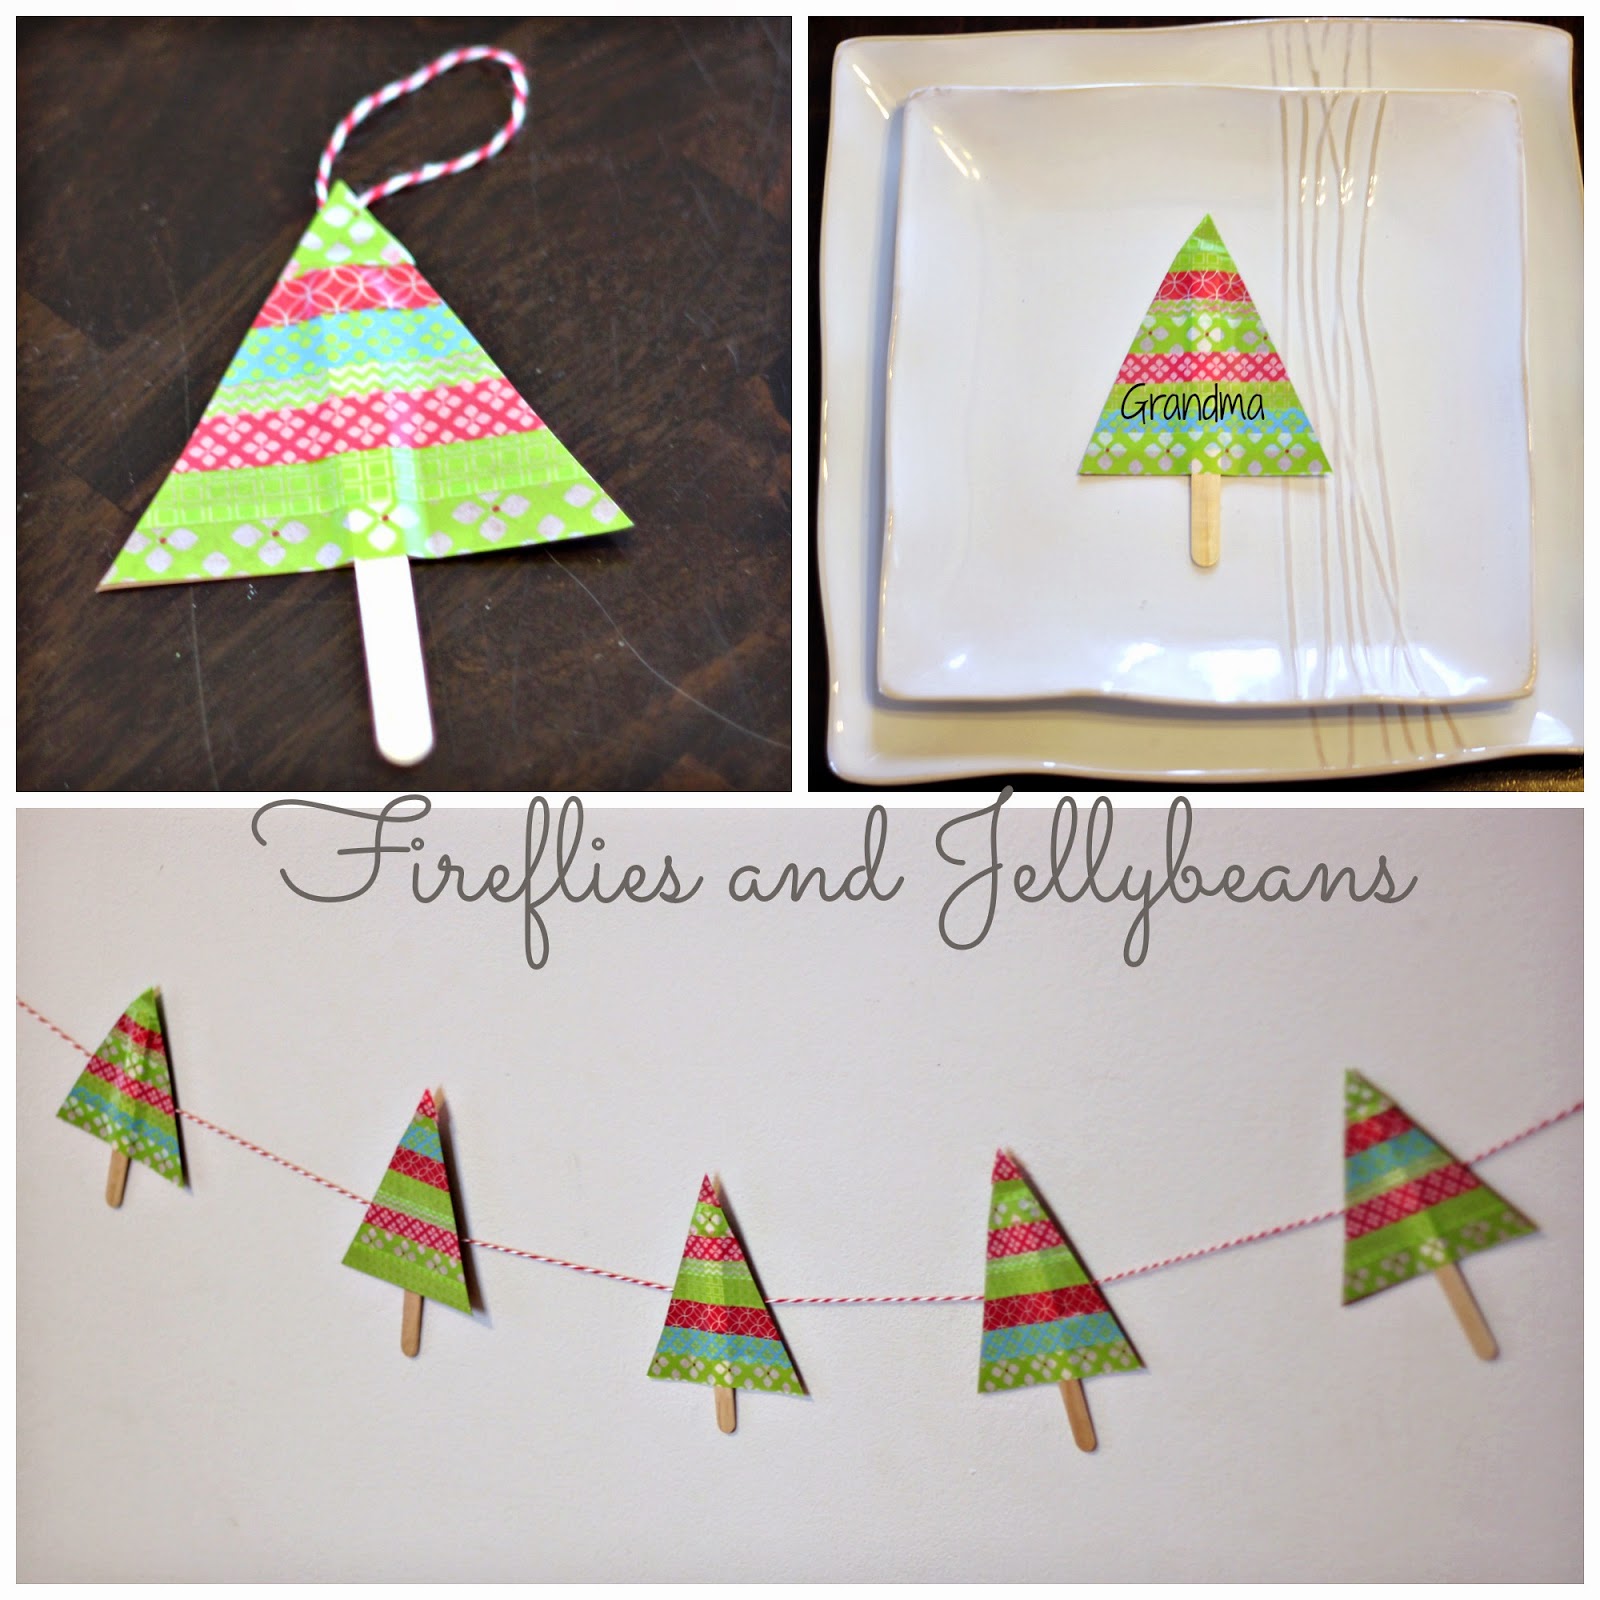
4. Hang on the tree.


Since it was the babies first Christmas we made a little shell baby too, by glueing a couple shells together and adding a face! 


Happy to join in the fun!

Wednesday, December 24, 2014

Messy Christmas

Merry Christmas.  It's the most wonderful time of the year.  It is supposed to be filled with magic and wonder.  We look at our nativity scenes, with a clean put-together Mary, Joseph and Jesus with their halos in the clean stable with the animals calmly looking on.  We sing "Silent night... all is calm, all is bright".  It's seems like it is supposed to be clean. 
But I don't think that it is.  The Christmas season is the most stressful time for me.  Dealing with extended family, trying to find the perfect gift for the kids, stretching our budget, rushing around to the next holiday event, trying to get everything right... where is the merry?  Why do I find myself crying all the time?  Isn’t it supposed to be joyful? 

The Merry Christmas - the "clean" Christmas is not how Jesus arrived.  I doubt it was a "silent night" or calm when Jesus was born.  I mean poor Mary had just traveled across country on a donkey 9 months pregnant, to have her baby in a barn.  Do you think she was calm? And Joseph, poor guy had to deliver this baby (that was not his) in a dirty place filled with animals.  I doubt he was thinking "This will make a great scene someday with action figures of us".  I think that they were both probably pretty stressed out!  

But that is the great thing about Jesus.  He didn't come into our world on a perfect, calm, silent night.  He came into our world in a messy stable.  With real people as his parents, with real life problems...like a king trying to kill him.  It was stressful.  Can you imagine being Mary, having her first baby be the Son of God?!?  That is a lot of pressure for a first time mom.  It's so easy to look at "nativity scene" Mary with her calm smile and think she had it all together, but I think she was real.  I am sure she spent a time or two crying because she didn't know what to do.  

But still we can find joy in the messy.  I put so much pressure on myself to have a Merry Christmas, to make it magical, that I can miss the little things.  Like my 4 year old telling the Christmas story to the 1 year old using the Fisher Price "Christmas People".  Like my 6 year old learning that Christmas is about giving and not getting, and giving his sister half his cookie when she didn't get one at the party.  Like the time we spend as a little family under our fort reading the Advent story.  Little things like that make the season truly joyful.   Mary had dirty shepherds come and visit and she treasured it in her heart.  They were probably not the guests that one would expect, but she found joy in the messy...and so can we.  

So it is OK that it is not a clean and Merry Christmas.  It's Ok that it is messy.  It was messy at the beginning.

Thursday, December 18, 2014

5 five minute Holiday Crafts using #BICMerryMarking!

This post brought to you by BIC®. The content and opinions expressed below are that of Fireflies and Jellybeans.
 
I am so excited to join in the fun with BIC Mark-It™'s Month of Merry Marking!  Easy Holiday Crafts that get me all in the mood for Christmas!  Let me tell ya- I love my BIC Mark-It™Markers I have a set of the fine tip and the ultra fine tip and they get a lot of use!
Check all the fun projects and get the booklet of merry marking and a coupon to start marking   And be sure to join in on the #BICMerrryMarkng!
#1
For the 1st craft I used #Amethyst to create a postcard to send to some family who lives out of state.  Since we live in Minnesota (AKA the Great White North) I made a "Wish we were there" postcard!  
It is so easy- just cut a piece of card stock in half and draw a picture on one side and make the post card on the other!
#2
Second I made some gift cards and used Metallic #YellowGold to make them all fancy!  Here is a trick- color around the hole punch hole with the gold and it makes it look more like a gourmet.  You can doodle and add some washi tape to make them extra special!  Perfect for any gift! 

#3
Since I was making gift tags I moved onto gift wrap! 
I used the metallic #PlatinumSilver to dazzle this gift.   Just wrap a gift with white or kraft paper and use your BIC Mark-It™ markers to decorate.  You can use stencils or just free hand!  It also works great on gift bags!
#4
Next up: Party time!
I used #MargaritaGreen to make some holiday stir sticks/straws!  I used an index card cut in half the long way and also cut out the flag shape.  I folded them in half and wrote some holiday themed phrases on them!  Such an easy way to add some holiday fun to the party!
#5
Now it is time to spread some cheer!  Make a super easy neighbor gift using #MidnightNavy.  Use an index card and punch a hole on the top and bottom.  Decorate and put on a candy cane and you have the perfect gift to leave on your neighbor's door!
Now it is your turn to do some #BICMerryMarking!  I challenge some of my favorite bloggers: Beth at Home Stories A to Z, Mandy from SugarBee Crafts, Kimbo at A Girl and a Glue Gun, and also YOU to join in the fun!  Go get the booklet of merry marking and a coupon to start marking!!

Saturday, December 13, 2014

Simple Classic Christmas Wreath

I am teaming up with QVC  to make this Classic Christmas Wreath

I was sent this Pre-lit Christmas Wreath (Designed by Ellen DeGeneres) to decorate.
They had me at pre-lit!  
It really is beautiful just by itself, and I like that it can either be soft white light or bright colorful lights (there is also an option to have it fad into both).  So, if next christmas I decide to decorate in more whimsical colors - this wreath still works! Plus it also has a timer option! 

But this year we stuck with a classic, more traditional look.

Here is what you will need to do:
1. Gather supplies: Pre-lit Christmas Wreath, tulle, ribbon/trim, card stock.
2. Wrap the tulle around the wreath.
3. Cut out your letters.  I used my Silhouette cutting machine but you can hand cut them too.  Use a hole punch to punch 2 holes in the top of each letter.
4. String the letters on your trim/ribbon and attach to the wreath.

Here it is sitting with my other Christmas decor:


Need some more Holiday decor ideas?  Check out Your Home with Jill:
QVC’s Jill Bauer hosts the network’s popular show, You’re Home with Jill® and provides fans with simple solutions for their busy lives through innovative products, a library of stress-free DIY projects, and crowd-pleasing recipes. Fans can connect with Jill on Facebook, Twitter, Pinterest, and Instagram @jillbauerqvc.

**Disclosure: I was provided with the Pre-lit Christmas Wreath. However all my project ideas are mine and my opinions are 100% honest. **

Monday, December 8, 2014

Yarn Hat Ornament DIY (Made from a TP roll)

Here is another super easy, super cute DIY ornament! 
 And kids can do it too!  It is a great way to keep hands busy!  
I would say this craft would work best for ages 8+ (My 6 year old had a hard time doing it)


Here is what you will need to do:
1. Gather Supplies: TP roll, Yarn or Tulle, Scissors
2. Cut your TP roll to about 1.5 inch thick
3. Cut about 80-100 strands or yarn about 10-12 inches long.  To make it go faster i wrapped my yarn around a small book and then made one cut to get a bunch of strands at the same time.
4. fold your yarn stand in half.
5. put your yarn through the TP tube
6. pull up both ends through the loop.

7. Continue looping your yarn around the tube.  To make it go faster you can combine 3 or 4 stands at time.  But if you want your kids to be occupied longer - make them do it one at a time! ;) 
8. Continue all around the tube.
9. Gather all the long stands to the top and tie a string around the outside to form the hat shape. 
10. Trim off the long stands to get a nice even "ball" on toop

Tie a string around to hang it up and you are done! 

You can also use tulle using the same steps as above.  You don't need as many strands since the tulle is thicker (I used 17 stands for this one).  You can also make different stripe patterns too! 

Make a bunch:
 They would make a great add-on to a teacher gift and the kids can say they made them too! 

Friday, December 5, 2014

Lace tree on a Burlap Canvas (DIY!)

 I love the burlap canvases that they have out now.  I already had a canvas and some burlap from another project so I just made my own.  And then decorated it up for Christmas with some lace! 

Here is how to make your own:
1. Gather supplies: Canvas, Burlap, Lace trims, Hot Glue Gun.
2. Cut your burlap about 2 inches bigger on each side of the canvas. Place the canvas in the middle and cut a slit diagonally from the corner of the burlap the to the corner of the canvas. 
3. Fold the top and bottom down and hot glue in place.  Make sure to get it as tight as you can with out ripping it.
4. Fold the sides over making sure to keep the corners neat.

5. Now the we have our burlap canvas lets add some lace! 
6. Start at the bottom with a long line of lace. Use hot glue to attach it.  
7. Add a line of ribbon ball trim.  Make each level shorter to form the tree shape
8. Repeat until you get to the top.

Match it up with this burlap and lace tree


Wednesday, December 3, 2014

Burlap and Lace Tree Tutorial


I love burlap and lace together.  So, here is my Burlap and Lace Tree.  Perfect for your holiday decor! I


1. Gather Supplies: foam tree form, burlap, lace trim, ribbon ball trim, hot glue gun, straight pins.
2. Cut a square out of the burlap and hot glue it to the top of the tree.
3. cut a long rectangle and wrap it around the tree spiraling down to the bottom, using hot glue to secure it. 
4. Start with the ribbon ball trim and wrap around the top one time using straight pins to attach it - or use hot glue. 
5. Repeat with the lace.
6. Continue with the same pattern all the way down the tree. 


Saturday, November 29, 2014

Teaching generosity for the Holidays- Kids DIY Teacher/Friend Gift {#StreamTeam}

Thank you to Netflix for sponsoring this post! 
So my kids start to get really greedy around the holidays.  They are always talking about what they want for Christmas.  When the toy catalogs come in the mail (That I DID NOT order!) they grab them and circle everything in them.   So to combat all the "I want, I want, I want" I made them make some gifts to give their friends.  I told them that we are going to give these gifts and not expect anything back.  It was tough because they really wanted the Chocolate bars - but I really wanted to focus on the giving. 

They are fast and easy to put together - Here is how you can make your own: 
1. Cut our card stock into 2 rectangles one 3.625"X8 and 3.625"X5" (The 3.625" is when you cut a whole sheet into 3rd's)
2. Put the smaller rectangle on top of the larger rectangle with the bottoms lining up.  I sewed around the edge of mine to give that cute factor but you could totally glue it.
3. Test to make sure your chocolate fits. :) 
4. Decorate with washi-tape or stickers or what ever you have! 

Here are the kids working hard on them. 


Here are the ones the kids made:

You could also do a none-candy option too! 


We have been loving the new VeggieTales In the House series that just started this week! 
My kids are HUGE VeggieTales fans! 
You can only watch this series on Netflix


*Disclosure: I am part of the Netflix Stream team.  However all opinions are 100% honest! 


Wednesday, November 19, 2014

Washi Tape Tree (Easy Christmas Craft is less then 5 minutes!)

I am totally into Washi tape these days!  So here is another quick and easy craft you can do with Washi tape that will take less then 5 minutes to complete!  And the kids can help too!  A cute little tree for Christmas.

Here is what you will need to do:
1. Gather supplies: Washi Tape, Popcycle stick, card stock.
2. place the stick on the card stock with about an inch or so hanging off the bottom.  Tape strips of Washi Tape over the stick to cover it. 
3. Cut out a tree shape
4. Repeat - repeat - repeat! 

They are so cute and you can use them for so many things... like: 
An ornament/gift tag, a place setting name tag, or make a bunch for a cute garland

I am part of:


Tuesday, December 17, 2013

My Favorite handmade gift ideas for kids

Here are some of my favorite gifts that I have made either for my kids or or others people kids.  These are the ones that were the biggest hits with the kids and the parents!


I would love to see if you made any of these!  Email me at [email protected] if you do! 

Content Ad