Showing posts with label Go Green. Show all posts

Thursday, November 12, 2015

Easy Shell Christmas Ornament (15 minute craft!)


So, glad to be joining in Craft Lighting this month again!  This time the theme is Holidays! 
Growing up my family always got or made ornaments that had to do with what the past year held.  So, I wanted to carry that on with my kids.  A few years ago we went to South Carolina (to visit my sister) and collect a bunch of shells from the beach.  So at home we picked out some shells and decorated them for our tree. 

It is super easy to do! 
1. Select your shells.  I liked to find ones with holes in them already to give a place to tie a ribbon but it is not necessary.
2. Paint the shells with either glitter paint or any color that matches your docore.  We liked gold/ glittler red and silver.   Get the kids involved! 

3. Let dry and attach the ribbon.  If there is not a hole just use hot glue! 
4. Hang on the tree.


Since it was the babies first Christmas we made a little shell baby too, by glueing a couple shells together and adding a face! 


Happy to join in the fun!

Monday, December 8, 2014

Yarn Hat Ornament DIY (Made from a TP roll)

Here is another super easy, super cute DIY ornament! 
 And kids can do it too!  It is a great way to keep hands busy!  
I would say this craft would work best for ages 8+ (My 6 year old had a hard time doing it)


Here is what you will need to do:
1. Gather Supplies: TP roll, Yarn or Tulle, Scissors
2. Cut your TP roll to about 1.5 inch thick
3. Cut about 80-100 strands or yarn about 10-12 inches long.  To make it go faster i wrapped my yarn around a small book and then made one cut to get a bunch of strands at the same time.
4. fold your yarn stand in half.
5. put your yarn through the TP tube
6. pull up both ends through the loop.

7. Continue looping your yarn around the tube.  To make it go faster you can combine 3 or 4 stands at time.  But if you want your kids to be occupied longer - make them do it one at a time! ;) 
8. Continue all around the tube.
9. Gather all the long stands to the top and tie a string around the outside to form the hat shape. 
10. Trim off the long stands to get a nice even "ball" on toop

Tie a string around to hang it up and you are done! 

You can also use tulle using the same steps as above.  You don't need as many strands since the tulle is thicker (I used 17 stands for this one).  You can also make different stripe patterns too! 

Make a bunch:
 They would make a great add-on to a teacher gift and the kids can say they made them too! 

Monday, November 10, 2014

Washi Tape- TP roll- Turkey {Easy Craft Tutorial}

Need a super cute and fun Turkey Day craft?  I have it for you today!
  These would be so cute as name cards at Thanksgiving place settings!  And the kids can help! 

1. Here is what you will need:
Washi Tape 
TP roll
scrape Kraft paper (Or from a paper bag)
Wax paper
Scissors
2. Cut your TP roll in half
3. Cover the roll with Kraft Paper and tape it... this is the back side.
4. Push down the top to form the head.

5-6. Take a piece of wax paper (about the size of an 8X11.5 piece of paper) and cover it with strips of Washi Tape.
7. Make a "feather" template (optional) out of scrape paper and trace it several times on your Washi Tape sheet.
8. Cut out your feathers.

9. On the back side tape a feather to the middle.
10. Tape 2 other feathers on either side.  Depending on how big your feathers are continue until you are happy with the feather coverage.
11. Add a piece of Washi tape around the whole thing to keep the feathers in place and add a decorative piece in front. 
12. Draw on a face with Marker.

So Cute!  


Friday, May 16, 2014

Fresh Bloom Frock Pattern


My husband was getting rid of some dress shirts. which is like free fabric!  So I made a dress for my daughter.  

I used Blank Slate's Fresh Bloom Frock pattern.  
It is an intermediate pattern so I was a little nervous about using it but that collar to to die for so I went for it!  The pattern was great to work with and I am already working on a second Fresh Bloom Frock for a photo session of the kids!  There are step-by-step directions with pictures the whole way through and the pattern goes from 18m-8 so lots of sizes!  


**I bought this pattern and I am NOT getting compensated for this post!  I just loved it and wanted to share!**

Monday, March 17, 2014

DIY Crinkle Ribbon Baby Blanket Toy

A friend at our church is having twins.  It is so exciting because it took a lot of work to get these babies, and we are so happy for this family!  I always like to give a something hand made when I give gifts so, I made these crinkle ribbon blanket toys.  They are great because they can loop to a stroller, carseat of swing  or come along with the baby.  The crinkle adds another sensory aspect that babies love!  

Here is how to make your own. 

Wednesday, July 31, 2013

Easy Stick Animal Kids Craft


This was a super easy craft that ended up being a hit with my 3-year-old and 5-year-old.  It is so simple that you don't even need a step-by-step tutorial.  But I will lay out what we did! 

1. Go and send your kids out to find some sticks.  I thought this was going to be a great adventure with my 2 kids going out into the yard searching for sticks, giving me some time to set up the craft.  But, what it ended up being was: my kids walked out side the door and yelled "I don't see any sticks" and came back in side.  I was all "You didn't look, go try again" and the same thing happened. So, I ended up going out into the yard and finding the sticks (which were like 10 feet from the door and the kids could have totally found them if they would have just looked!) 

2. Draw the the body parts of the animals like the head and the body.

3. use glue to glue the sticks on for the legs, neck, wings, tail, etc.  I used hot glue because we were impatient. 

Here are the animals we made:


And we had lots more ideas like dinosaurs, or an octopus.   

Monday, November 19, 2012

How to Make Shakers from Squash Seeds

It is squash season here in Indiana, and though I've never been a huge squash person, I'm making an effort this year to eat more of what's in season. As a result, I have an abundance of different kinds of squash in my pantry. I was making this Turban Squash recipe (beautiful isn't it? Delicious too, by the way!) And it hit me that I could make a little percussion instrument out of the seeds. My youngest son LOVES anything musical, especially drums, guitars, and pianos. I knew he would love to have a shaker.

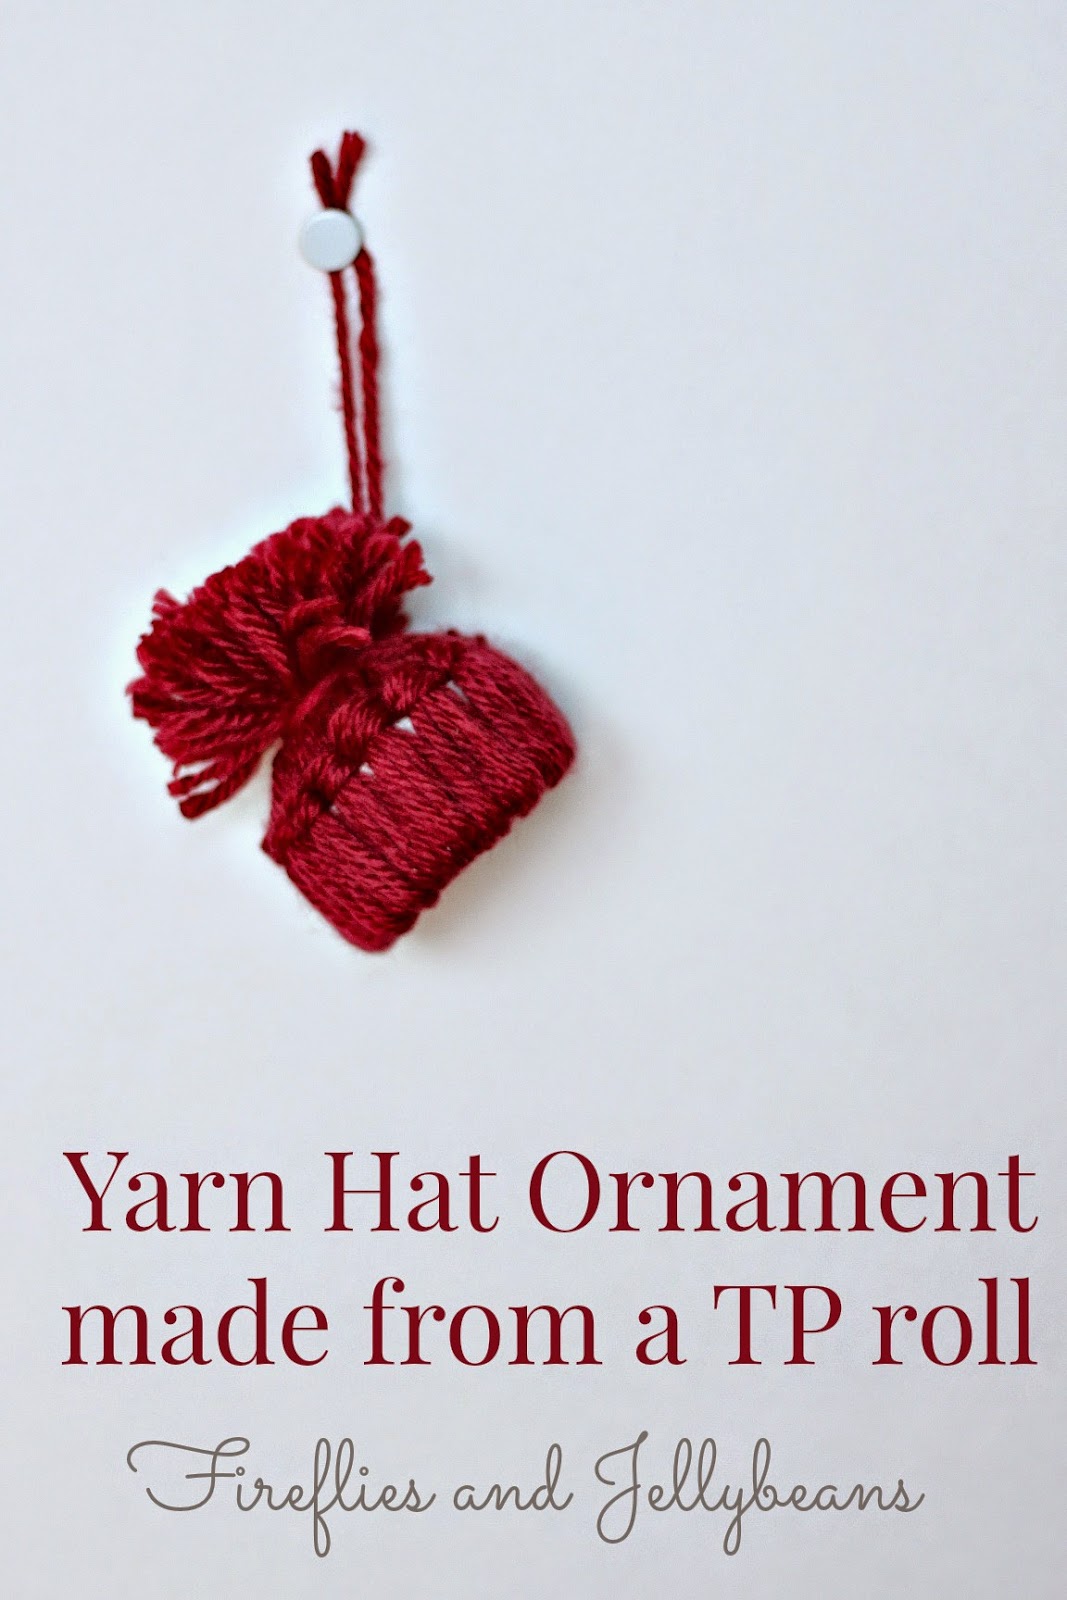
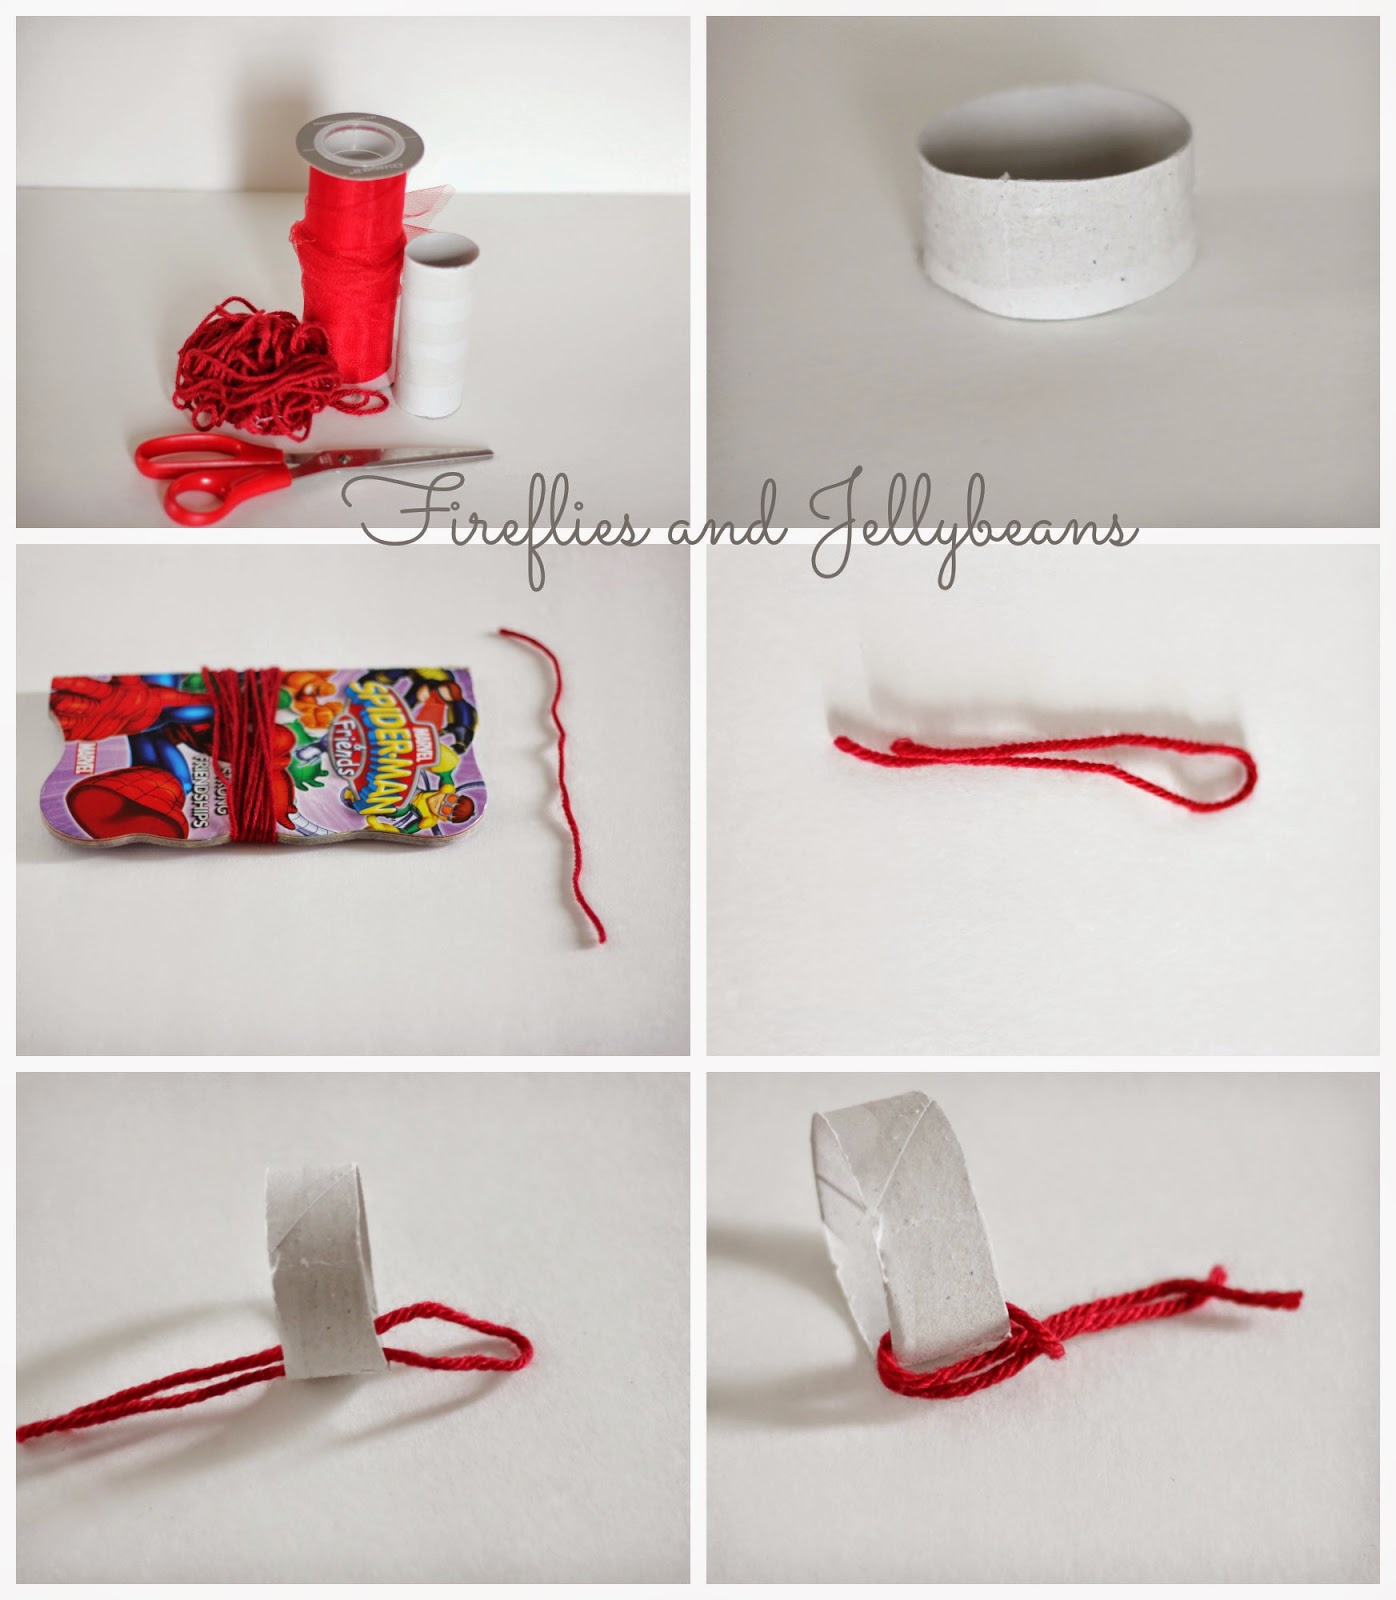
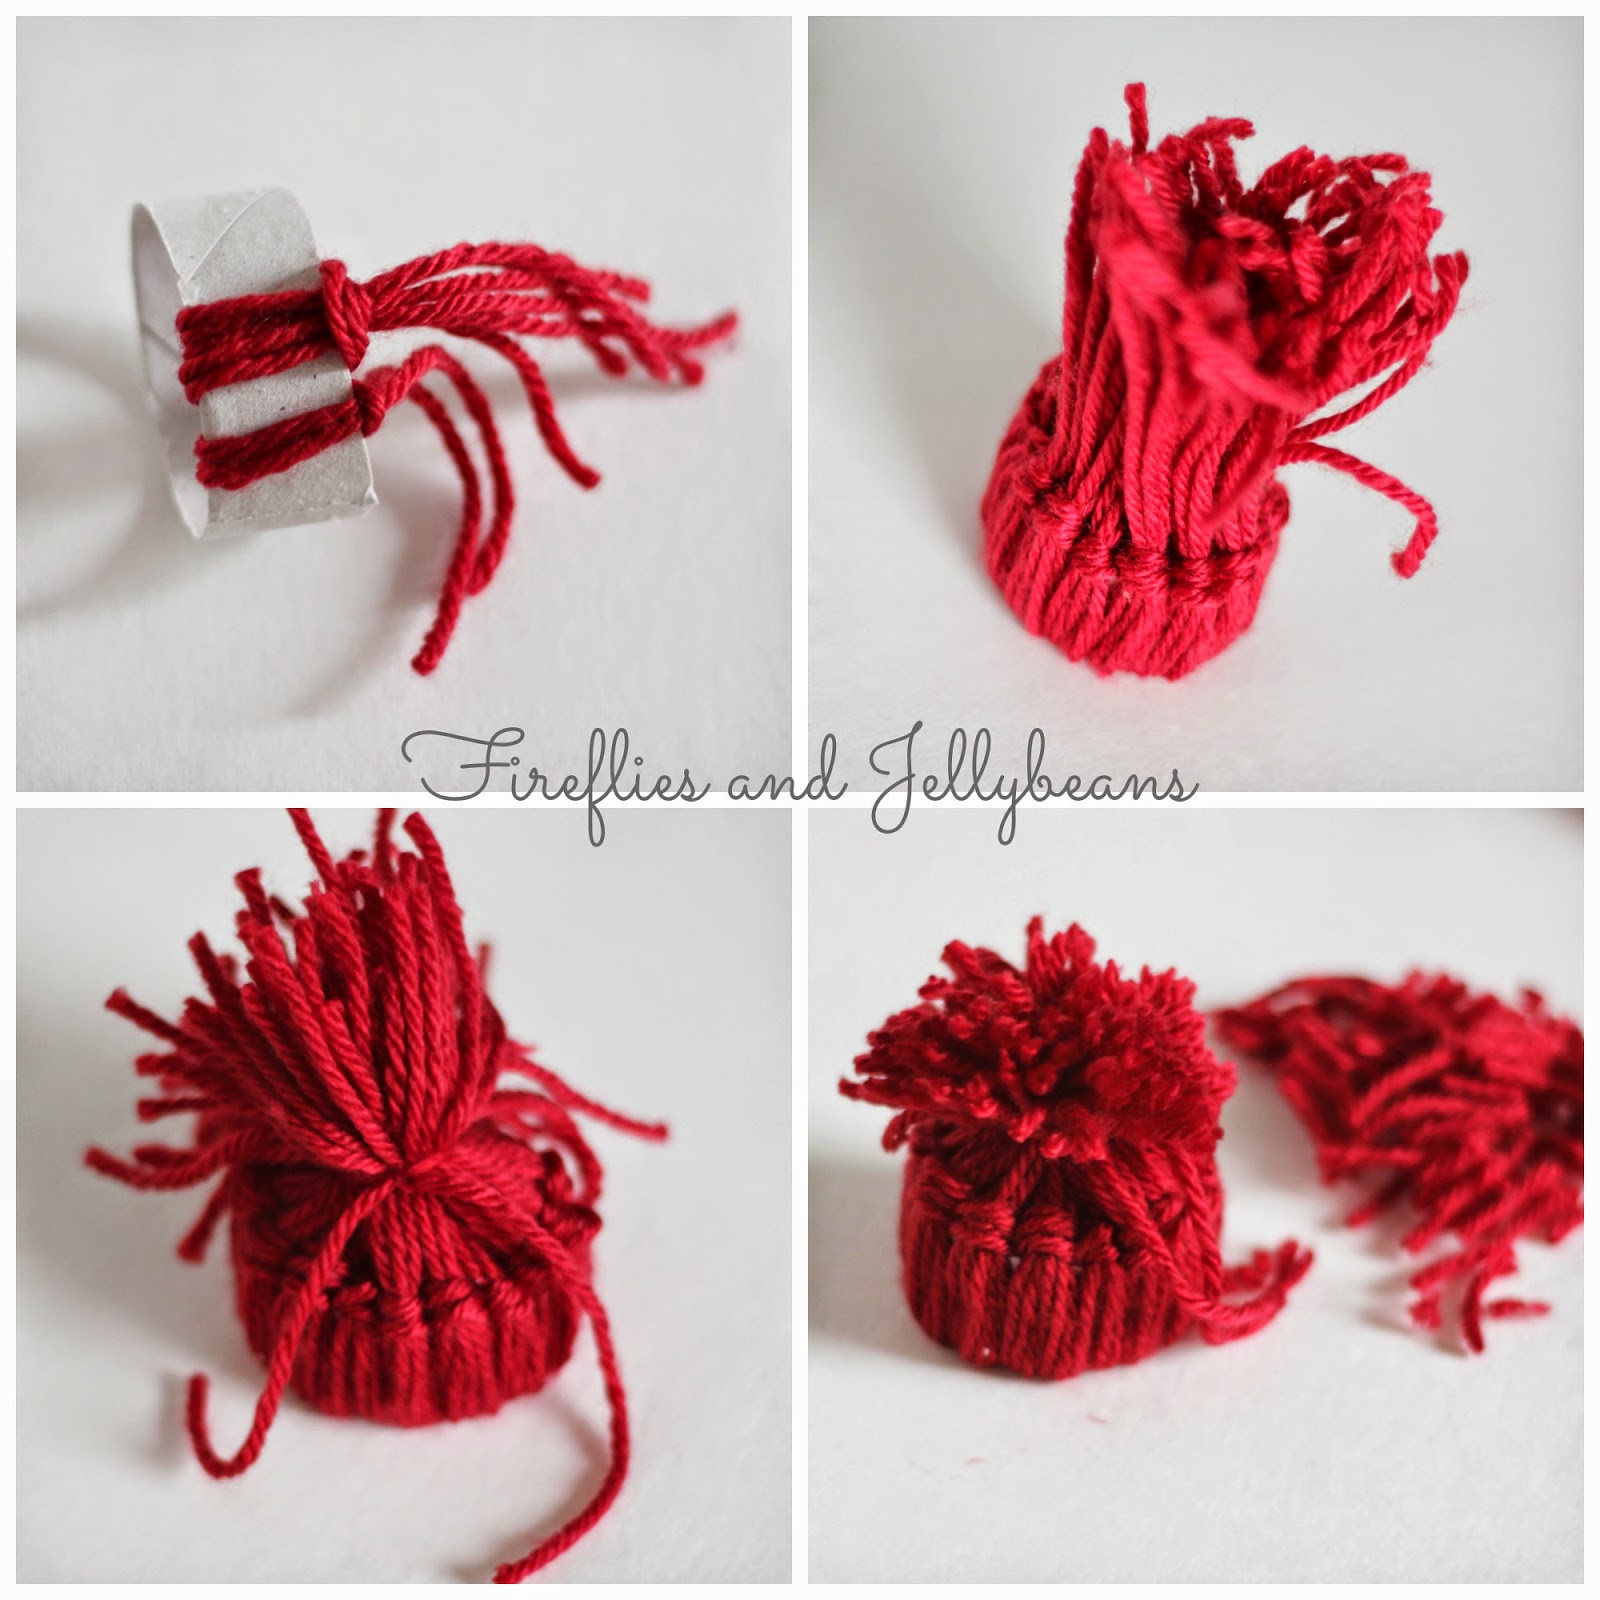
So, using nothing but things I already had in my house, I made him this shaker. It's not fancy, but it could easily be made prettier. My son is 3, and couldn't care less if his shaker is pretty, all he wants is for it to make noise. All you need is squash seeds, duct tape, and a water or juice bottle.


1. When cooking squash, save the seeds. When you have time, wash them through a strainer. Try to get as much pulp off as you can. If you have trouble, you can soak the seeds in a little water for a day or two and that will help separate the pulp.

2. Put them in a shallow dish to dry out for about a week.

3. Find a bottle or container - I happened to have these small apple juice bottles. Anything a child can easily hold in their hand and shake, will work fine.

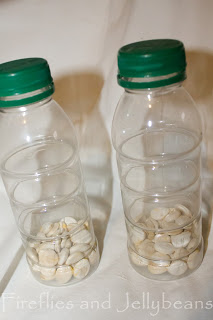
4. Make sure the bottle is clean and dry, put dry seeds into the bottle, and put the lid on.

5. If your kid is super responsible, and won't open the bottle and scatter seeds all over the house, then you're done right now! If not (like mine), you'll need to seal the lid onto the bottle.

~ I used duct tape (told ya it's not pretty!). You can buy pretty duct tape, and if I had some on hand I would have used it, but I didn't.
~ You could cover the whole thing with duct tape and let the kids marker on it. I might still do that.
~ You could also let the kids draw/paint a piece of paper, and put it inside the bottle, wrapped around the inside edge so it looks pretty.
~ Be creative!


However you decide to decorate (if at all), you have a shaker! I made two, one for each of my boys, and my older girls (6 and 7) are super jealous, and can't wait til I have enough squash seeds to make more. My 15 year old thinks I'm crazy for saving squash seeds in an old juice bottle. ;)


Monday, November 5, 2012

Make Your Own Yogurt!

Yes, you can make yogurt! And it's SO MUCH easier than you might expect. And so much healthier because it's free of all the extras and additives that so many packaged foods have these days. There are many make-your-own-yogurt instructions out there, and this is mine, a combination of ideas, and tweaked over the years.

Supplies:
~ Slow cooker (a.k.a. crock pot) - any size
~ Small kitchen thermometer
~ Oven with a working light


Ingredients: 
~ milk (whole milk will make a thicker, creamier yogurt, but you can use any milk)
~ plain yogurt to use as a starter
(I have experimented with different brands and types of yogurt as well as dry "starter packets" and have found that a good organic yogurt makes the best yogurt BY FAR.)

Method:
* Use about 1-2T of yogurt to every quart of milk *
1. Pour milk into slow cooker
2. Put the lid on, but prop open with thermometer (to keep the thermometer where it's supposed to be)
 3. Turn cooker on (either low or high, depending on how fast you want to heat it), and heat to about 110 degrees F (I have accidentally heated it to 130, and it still worked. I have also accidentally heated it to 140 and it did not work.)
4. Add yogurt
5. Lift crock out of the cooker, take the thermometer out but leave the lid on, and place into cold oven.
6. Turn the oven LIGHT on (do NOT turn the oven on!) and leave overnight or 8-12 hours
(the light keeps just enough warmth in the oven to maintain the perfect temperature for yogurt making)
That’s it!  Now you have yogurt. So beautiful.
Top with honey and fresh fruit and/or granola for a delicious parfait!

 {Sometimes liquid will separate out of the yogurt. This is whey. It is high in protein and amazingly good for you. You can give the yogurt a shake and mix the whey back in, or you can siphon it off and use it in baking. Do a search on uses for whey. You will be amazed.}


Tuesday, September 4, 2012

Easy DIY Detangler

Raise your hand if you have a child with tangly hair? My daughter has VERY thick, curly hair. It's beautiful, and I'm totally jealous, but it is a nightmare to comb through. This is how my daughter wakes up in the morning, on a good day:

I have a mommy confession: I got lazy very busy over the summer and neglected to take proper care of her hair on a daily basis (in other words, I let her brush her own hair after her baths), and by mid-summer, no joke, I found the start of a dread lock in the middle of her gorgeous mop. I tried to comb it out, but ended up having to cut it off.

I have tried every type of detangler you can find at the store. I have also tried tricks like rubbing a dab of conditioner through her hair and leaving it in there. But after researching homemade detanglers, I came up with my own recipe that is EASY, CHEAP, and works great, which is the best combination for me. Most likely you already have everything you need to make this.

Here it is:
1. Buy a spray bottle or, use an empty one recycled from something else.
2. Put about 1 Tablespoon each of olive oil and apple cider vinegar into the bottle (I never measure, I just pour in a splash - this is not an exact science here).
3. Add a few drops of good smelling essential oil (Lavender is my fave) - this is optional. It smells better than vinegar.
4. Fill the bottle with water, and give a little shake.

To use: spray hair thoroughly with detangler, and comb through.

~ This works on wet or dry hair, but since it's mostly water, you'll probably want a towel around the shoulders if hair is already wet. Works fantastic on morning bed-hair!
~ This works well as a leave-in conditioner too. I have the straightest, slipperiest hair in the world. I barely even have to comb it. I use it in place of conditioner, and I love it.
~ We have a variety of hair types and ethnicities in our home, and so far it has worked well for everyone. If it makes your hair feel too greasy, then decrease the amount of oil.

 Here she is after being sprayed and combed. As her hair dries the curl bounces back and looks gorgeous!
I would love to know if you try this, and how you like it!


Tuesday, August 7, 2012

Summer Fresh Tomato Basil Alfredo Recipe

I don't know about you, but here in Northern Indiana, the tomato crop is coming in, and mine is glorious! I love tomatoes. I can't say enough how much I love them. I love to see that burst of orangy red within the green bush when I'm harvesting. I also LOVE, LOVE, LOVE fresh basil.


This recipe is VERY simple, and it's a go-to for me on busy evenings, or nights I just don't feel like cooking. It's best in summer when the tomatoes and basil are fresh and at their peak of flavor.


Ingredients:
1 box pasta of your choice
1/2 pound sage sausage (or chicken or shrimp would also be yummy, or no meat at all if you want a vegetarian option)
about 20 cherry tomatoes, or the equivalent amount of any other tomatoes
a handful of fresh basil, chopped (to taste - I used about 6-7 large leaves)
alfredo sauce (canned or homemade, your choice - I use my Betty Crocker recipe for sauce)

Directions:
1. Cook meat
2. Cook pasta according to package directions, then drain
3. Mix pasta, meat, tomatoes, basil, and sauce together in pan
4. Simmer for a few minutes to warm the tomatoes

{I actually added some swiss chard to mine as well, and nobody noticed - the color blended in with the basil, and the taste was unnoticeable - a good way to sneak in some extra power veggies!}
That's it! SO easy, and so FRESH!

Monday, July 2, 2012

Easy, Healthy, Black Bean Dip Recipe

Need a quick and easy Snack for the 4th of July picnic?  I have the perfect thing for you! 

Recently I was at the grocery store looking for a snack to bring to a friend's house for girls night. I was thinking about Hummus and Crackers, and I came across something called "Black Bean Hommus." I bought it because I love black beans, and I figured it would be good. It was amazing. So I set out to recreate it, and this is what I came up with:

Ingredients:
1 can black beans, drained {you can rinse them if you want, I didn't because I'm too lazy}
1 T minced garlic, or 1 large clove
1 T chili powder
1 t cumin
1 t onion powder
1/2 t salt
handful of fresh cilantro  
{real hummus would also have Tahini. If I had some, I would add some, but I've never been able to find it. I should probably order it from Amazon.}

Directions: Put all ingredients into food processor or blender and puree; garnish with sprigs of cilantro if desired. Dip crackers, tortilla chips, bread, or veggies.


Wednesday, June 20, 2012

Healthy Sweet Potato Casserole Recipe

I LOVE sweet potatoes, and they're SO much better for you than regular potatoes. However, if you look up sweet potato casserole recipes on the internet, you'll find that they're packed full of sugar. In my opinion, they don't need all that much sugar, because they're already sweet and delicious. So I came up with this recipe using honey instead of sugar, and only a few other ingredients. It's simple, healthy, and SUPER delicious. My kids always ask for seconds, that's how I know it's really good. There's no topping, so it look a bit plain. If you want, you could probably add some crushed pecans or sprinkle some brown sugar on top.

Keep in mind, I cook for 7 hungry bellies, plus my hubby likes to take left overs to work, so if this is too much for you, you could definitely cut this recipe in half. Also, I apologize, but I'm not a very rigid recipe follower, so some of my measurements aren't exact. It drives my husband crazy, so I understand if it does you too. I can't help it, it's who I am. ;)

Ingredients:
3 lb sweet potatoes (about 8-ish)
1/4 - 1/2 cup honey (to taste)
4T butter
1/2 cup milk
2 eggs
dash of salt


Directions:
1. peel potatoes, and cut into 1" (ish) chunks
2. put potatoes in a large pot and fill with water to just cover potatoes
3. heat on high, boil potatoes until tender (20 minutes?), drain and put potatoes back in pot
(veggie water is great for watering plants!)
4. add all other ingredients and mix together thoroughly
5. transfer to greased 9x13 baking pan
6. bake at 325 (F) for 30 minutes


Tuesday, May 22, 2012

Flip-Flops repurposed into summer home decor! {Tutorial}

So, I hate wearing flip-flops.  They hurt my toes and I cannot stand the feeling of them on my feet.  I know I am totally weird but there it is!  But- I do think that they are adorable.  I got a pair of flip-flops for my birthday, and I decided to repurpose them into a cute summer decor for my 3 season porch.  What could be cuter them to make them flip-flop photos?

Here is what you will need to make your own:
Flip-flops (the cheap ones!)
Lace 
Mod Podge
Spray Adhesive
Photos printed on paper
scrap wood (I used a broken ruler)
Hot Glue (not pictured)
Optional: Paint markers (not pictured)

1. Start by cutting off the band.

2. Trace around your flip-flop on your photos (my photos are 5X7 printed my regular paper in black and white).  Cut out your pictures and attach them to the flip-flop using spray adhesive. Poke a hole through the paper where the top hole was on the sandal.
3. Brush Mod Podge over the pictures to seal them to the flip-flops.  I did 2 light coats. Let dry completely.

4. Cut out 4 pieces of lace about 6 inches long each.
Use a pencil to help  push the lace through the hole in the sandal.
Use hot glue to attach the lace to the backside.

5. Use hot glue to attach your piece of scrap wood to the back of your flip-flops to attach them together. 
6. Optional: Use Paint Marker to add some fun to the bottom of the sandal.

I hung mine up on the wall.
I think these turned out pretty cute and would make a great gift! 
 So tell me, do you love or hate to wear flip-flops?


Linking to:
 
Today's Creative Blog

Content Ad