Showing posts with label thrifty. Show all posts

Monday, December 5, 2011

Airplane Shelf with Elmers Craft Products {Tutorial and Giveaway!} #LooksforLess

***Giveaway Closed!!!***

I was so excited when I got contacted by Elmer's  to join in their Looks For Less contest. I wanted to create something cool for my son's room and this was the motivation I needed. Check out Elmer's Looks for Less Guide for some awesome ideas!  
 
So, me and hubby brain-stormed what we could make that would be AWESOME. Our son's room is travel themed, so we came up with this fabulous Air-Plane Shelf:
Here is our inspiration:
Pottery Barn Kids Airplane shelf (out of stock but sold for $90)
Great Little Trading Co. Bi-Plane Wall Shelf (56 pounds, the company is located in the UK)
 
Supples:
2 White 20x30 Foam Boards
Black 20x30 Foam Board
CraftBond Extra-Strength Glue Stick
  X-ACTO Designer Series Gripster Knife
Elmer's Paint Pens
Wooden Dowels (not pictured)
Hot Glue Gun with Glue (not pictured)
Spray Paint and Primer (not pictured)
1. Glue two white foam boards together
2. Use a ruler to mark off how wide you want your shelves to be (mine are 6 inches X 30 inches) and use the ruler as a guide to cut the foam board with the X-Acto Knife.
3. Cut all the way through both layers of foam board.
4. Repeat for the second shelf.
5. Cut out the other shapes needed out of the single black foam board.  I cut out a big circle for the front, a propeller shape, 2 little circles for the wheels and 2 triangles for the wheel bases
6. I used my Circle cutter (from creative memories) to make the Circle template and then used my X-Acto Knife to cut through the foam.
 
7. To make the wheels I hot glued a small circle to a triangle.
 
8. To round off the corners of the wings I use a circle as a template.
 
9. We (my hubby helped!) cut out the fuselage out of the leftover double-width white foam board.  We cut out two fuselage shapes.  Once all the shapes were cut out we sanded the edges to make everything smooth. 
 
10. We cut our 4 dowels.  Hubby measured where we wanted everything to be placed.  We also used a small chisel to make tabs for the dowels and fuselage to fit into.
11. We glued everything together with hot glue.  Then we primed it with spray primer. 
 
12. To cover the edges I decided to use paper mache`... I would recommend doing this before you prime.   To make the glue for the paper mache` use a 1/2 water and 1/2 elmer's glue solution.
 
13. We found a picture of the Sop-with Snipe for inspiration for the paint job.  We spray painted the whole shelf with Camouflage green and added details with the Elmer's Paint Pens.  We also added our Son's first initial with vinyl to the side of the plane.
 
14.  For the propeller I added a couple of buttons for a cute detail {of course, using hot glue}.
We hung it up in my son's room and found some cute things to put on it.

The foam board holds up well.  I am not going to put my fine china on it, but it holds the small toys and books great!
I love the 3-d effect it has coming out of the wall! 
I only had to buy the spray paint (everything else was on hand!) so, it cost me $9 total... 1/10 the cost of the Pottery Barn one and this one is personalized! 

Wanna win some Elmer's crating supplies to make your own Look for Less?! 
Here is what you can win:
Black 20x30 Foam Board·         White 20x30 Foam Board
·         CraftBond All-Purpose Glue Stick
·         CraftBond Repositionable Glue Stick
·         CraftBond Extra-Strength Glue Stick
·         X-ACTO Designer Series Gripster Knife
·         Painters Assorted Colors Set

2 winners will be selected!  

Just leave a comment below to enter.
{Winners MUST be F&J followers!} 
Giveaway open until Dec. 12th at Midnight.

***I was supplied with materials from Elmer's to make this project... however my opinion is always 100% honest***


Linking to:


Home Stories A2Z

Tuesday, June 21, 2011

Painted Floor Covering (Tutorial!)

The carpet on my porch needed help... lots and lots of help!   It is partly my own fault... I picked the white carpet for my porch (you know the place where people will come in from the outside with dirty shoes)... But it is not ALL my fault.  I had a my carpet steam cleaned (by a "professional") and instead of getting all nice and white... they just sucked the dirt to the top for all to see.  Not good... not good at all!
So I made a floor covering inspired by the plywood rug from Sugar Bee Crafts
Pretty nasty before pictures!  I am almost embarrassed to post these... but this is real life!
See all the dirt sucked to the top... really pretty, huh?!

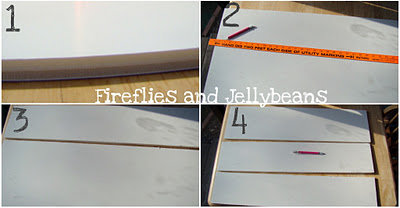
Here is how I made my Painted Floor covering

Supplies:
Two 1/4 inch Masonite boards (I got mine free from my dad who is a contractor!  But, he says they are less then $10 at home depot and the like)
Polyurethane
Craft Paint (I used DecoArt's Dessert Sand, Raw Ember, and Bahama Blue)
Stencil (mine is from Cutting Edge)
Paint brushes (not pictured)
Painter's tape (not pictured)

1. Tape your stencil in place with painter's tape.

2. Use a sponge brush and dab (up and down motion) the paint over the stencil.

Repeat, repeat, repeat all the way down the board.

3. Wash off your stencil, change paint color, and repeat step 2 all the way down the board

4.  Repeat Step 3 with the third paint color... this time space your flowers out a little bit more.

5. Paint on 2 coats of Polyurethane (I waited 12 hours between coats)

6. Be crazy and paint and seal another board. 
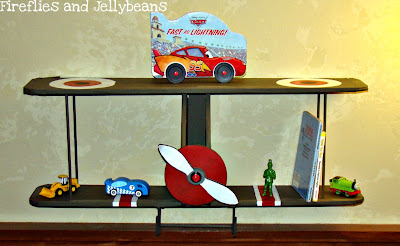
Place over your nasty, dirty carpet and be happy!! 

My 3 year old walked in to the porch the next morning and gasp (with delight) and said "Oh, mommy, it is so beautiful!" 
I couldn't agree more!
I just had to buy the craft paint for this project so it only cost me $2.50!
I'm loving it! (yes- I said that to the McD's jingle)

Edited to answer some questions:
1. Does it have much of an edge? 
     It is 1/4 inch thick, so no, there is not much of an edge... not anymore then a rug would have.  It is pretty thin.  I have a 3 year old and a 1 year (who walks) and they have not tripped on it. 

2. What is the durability?
   I have had this up for a little over a week and it is great.   I cannot give much more info then that.  I will try to keep you posted! : )

3. Do your chairs scrape?
   I have plastic sliders on the bottom of my chairs so they slide smoothly (like you would want to have on hardwood floors)  But without the sliders the chairs do scrape.  The sliders were $0.99 per chair at Home Depot.  The poly does help so you could always put another couple of coats on it if you are worried about it.  But it will seems to scrape much like hardwood floor would. 

4. Is it smooth on the bottom?  Should I put something under it?
   It is not smooth on the bottom (there is a little pattern to it like paneling would have).  If you are going to put it one hardwood or laminate I would suggest using a none-skid "rug" under it (Like you would with a regular rug).  That would help it stay in place too!   We don't have anything under ours since it is over carpet. 

5. Can you paint it first?
   Yes!  It would be really pretty white, I think.  I liked the natural color of the Masonite so I did not paint it first.  But it is paintable so go crazy with the color! :)  


Linking at:


Todays Creative Blog


I would love to see your projects inspired from F&J... post your pictures on our flickr group!

Tuesday, June 7, 2011

Summer Sewing for BOYS!! Mens shirt into boys shorts

Here is a SUPER easy sewing project for your summer time boy!

Take a men's shirt and turn it into shorts!
What is so nice about use the men's shirt is that your legs are already hemmed! : )  


Here is what you will need:
Men's Shirt
Dana's (From Made) Pattern for Shorts with pockets
(You use her pants pattern and shorten it for the shorts)

1. Cut out Dana's Pattern pieces and mark on the pattern how long you want your shorts to be... I used a pair of shorts my son already had.  Remember the legs are already hemmed so you don't need to add a seam allowance! 

2. Cut out the front and the back pieces 

3. Cut out your pocket pieces out of the extra fabric of the shirt.

Sew together using Dana's Shorts tutorial  and Pocket tutorial
 (honestly she has better pictures and directions that what I could do!) 

Love love love!!  
The boy and the shorts!  

I made this shirt into these shorts.

Here are some shorts I made out of Seersucker material using the same pattern.... I love this pattern... so easy for some awesome boy shorts! 
Of course I made a shirt to match!  I just cut out the shape of a 3 and used Wonderunder to attach it to the shirt and hand embroidered around it.  

Made is celebrating the SUMMER boy this week! 
Check out all the cool boy projects over there!


Content Ad