Showing posts with label Sew It Yourself. Show all posts

Wednesday, June 13, 2012

Cascade Ruffle Dress (Tutorial!)

Here is my next tutorial for our Sew It Yourself: Kid Clothes series!

Supplies:
Jersey Knit
Sewing machine with sewing tools

I used the Cascading ruffle Skirt tutorial from Lil Blue Boo, but I didn't add the elastic for the waist.  Ashley has a FULL tutorial with downloads to make this cute skirt!
Once you have completed the skirt, put it aside and we will make the top.
Now use a tank top that fits your daughter to make a pattern for the top.  Make a pattern for the front and back.  I folded my shirt in half and traced.

Place your pattern on the fold of your fabric cut out 1 front and 1 back.

Optional: Surge the sides to give it a finished edge.  You also could hem or use knit binding to finish the edges as well. I am lazy so I left the edges surged and called it good!

Place Right sides together and sew the shoulders and the sides together to make the top. 

With right sides together pin your top and skirt together and sew... and you are done!!

It is the perfect comfy summer dress!
Run, dance, and jump for joy!
Shake your booty!
"Mommy, Daddy's lawn mowing is loud!"


 Linking to:
 

Tuesday, June 5, 2012

SIY: Kids Clothes: Tea Towel Skirt with Jenny from Days Of Chalk and Chocolate!

Let's welcome our first Guest Poster for our Sew It Yourself: Kids Clothes Series! 
Today we have Jenny from Days of Chalk and Chocolate!  Take it away Jenny! 
_______________________________________________________________

I'm so excited to be here at Fireflies and Jellybeans today!  Thank you, Fawnda, for letting us share our children's clothing ideas!

I write the blog, Days of Chalk and Chocolate, which is mostly about my adventures DIY, decorating, crafting, and mothering all while on a teeny budget.  Sometimes I throw a little elementary teaching in as a topic as well!  I hope you'll stop by and visit me sometime to see some of my other projects.  Here's a sneak peak of some reader favorites!

Fall Ruffle Wreath
Love Note Pillows
Stuffed Artichoke Tutorial
Chair Tutorial


I just started sewing this year and I'm trying my hand at simple skirts for my daughters. Recently I made them matching skirts out of tea towels! 

I was browsing in Home Goods the other day and found two tea towels in the prettiest red, pink, and white floral fabric. I grabbed them because they were the only two there and didn't know what I would do with them but I knew it would be something!  I paid $6 for both.  My daughter Molly is always asking to dress like her sister, Ellie (she thinks it makes them twins despite the fact that Molly is 5 and Ellie is 21 months but whatever!) so I decided the towels would make perfect matching skirts!

The towels!  Aren't they so pretty?


I studied a bunch of tutorials I found online and got the gist of what I would need to do.

This is how I did Molly's skirt.  Molly needed her skirt to be 12 inches to hit just above her knee and has a waist of 19.5 inches. I didn't bother measuring the width because I was just using the width of the towels.  Molly's skirt would have the striped band at the bottom but it was too wide so before I cut the fabric I folded the band up and stitched. This became my new bottom and I measured from there.  Ellie's skirt was the remaining fabric on the other side of the towels. The lengths just worked out perfectly for me!


I then cut the towels so I had 2-13.5 inch pieces ( 12 + 1.5 inches to account for the seams).


I sewed each side seam, right sides together, to make the tube of the skirt.  Then I pressed the whole thing so it was nice and smooth.  Press open your seams as well.  Keep it inside out.


The best part of using the towels is that you don't have to worry about finishing any of the edges.  They are already hemmed for you.  All you have to do is the waist band!  Sweet! 

Fold over the cut edge about a 1/4 inch-1/2inch and press. Then fold it again, this time wide enough to fit the size elastic you are using. Press again.


I sewed the waist band as closely to the edge as I possibly could.


Do not sew completely around!  I left a 1 inch opening in the waistband through which I could shimmy the elastic.


We all like to be thrifty, right?  Well, then  I won't be embarrassed to tell you I didn't even use real clothing elastic. I had two never used elastic headbands in my vanity drawer for ages so I used those!  Luckily they were large enough for my daughters' waists.   I cut the elastic about 2 inches less than their waist measurements.


I fastened a safety pin to the end and used that to guide the elastic through. Learn from my mistakes. You'll save money on Band-Aids if you buy good quality safety pins instead of cheaping out with dollar store pins which actually bend. Who ever heard of a safety pin bending when you close it?  Well, I suffered so my girls would be adorable because that's the kind of mother I am.


I used a zig-zag stitch to secure the ends of the elastic and I ran it twice so that it wouldn't come apart. 


Then I hand stitched the waist band closed. DONE!  Well, not really. Molly woke up the next day and saw Ellie's skirt had a ruffle so of course hers had to have one too.  Here are the finished products!


And yes, I always hang my daughters' clothes on a ladder in our backyard with a mason jar filled with flowers next to it. Don't you??

I had a dandy of time getting them to stand still for pictures but I tried!


Thanks again for letting me share my tea towel skirts with you today!
Cheers!

Monday, June 4, 2012

Off The Shoulder Ruffle Romper Tutorial!

Today we are starting a New Series!  Sew It Yourself: Kids Clothes!  All month we will showcase kids clothes tutorials!  

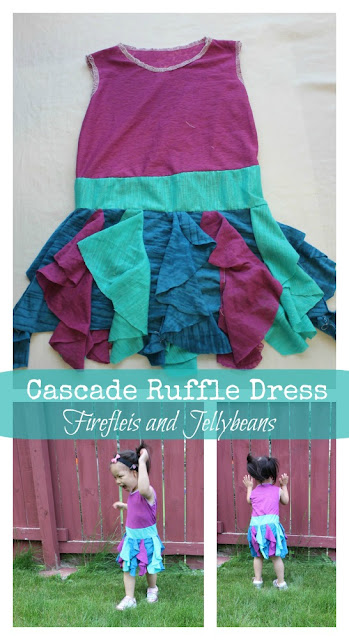
First up is my Off the Shoulder Ruffle Romper:
Supplies:
Stretch/Jersey Knit
Elastic Thread
Sewing machine with other Sewing tools (Thread, scissors, etc)
Serger (optional!)
Paper (for making a pattern)
Current tank top that fits (for making a pattern)
Current shorts that fit (for making a patter)

Making the pattern:
Let me preface this with- I have never made my own pattern from existing clothes before now.   I always thought that it was difficult and wouldn't really work for me... but it totally did!  AND It was way easier then I thought!  After I figured this out I made 3 other dresses for my daughter (Tutorials coming soon!) SO- I hope you try it too!

1.  Take a tank top that fits snugly right now to make this pattern.  Fold one shoulder down and trace on to a piece of paper.  (I was able to use a regular piece of paper for my 2T-3T size but if you need bigger you can either tape paper together or use freezer paper). 
2. Now, take a pair of shorts (I used the bottom of a romper I had already) and fold in half with the crouch folded out so you can trace around it.  Make the side on the pattern that has the fold.

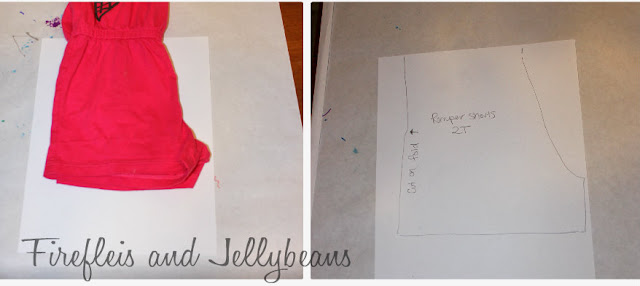
3. Use your patterns to  cut out your pieces of fabric.  I trace my patterns right onto to fabric.  It makes it so much easier to cut out.  I use a sharpie because I finish all the edges and you don't see the marker anyway.  Make sure you cut your shorts on the FOLD!!  You need 2 shorts pieces and 2 shirt top pieces.

Making the Shorts part:
4. Open up both shorts pieces and place right sides together.  Pin and sew on the curves sides (See below)

5. Open up the shorts and place the seams in the middle to form the shorts shape.  Now, pin and sew the crouch in on continuous line.

6. Hem the shorts legs by folding under and sewing.  Place the shorts to the side for now.

Sewing the Shirt top Part:
7. Finish off the one armpit sleeve on each top piece.  I serged them and called them good because I was being lazy.  But you could hem them or using binding too.

8.  Now, we are going to add the ruffle.
A. Cut a strip that is at least 2 times as long as the "neck" of your shirt.  My strip was 2 inches wide.  Serge or hem one side.
B. Gather your strip.  I use this cheat technique from Made. 
C. Pin and sew your ruffle to the "neck" with the RIGHT side of the ruffle to the WRONG side of the shirt.
D. Flip the ruffle to the RIGHT side of the shirt.  Not the Right side of the ruffle should be facing up.  Top sew the ruffle in place.
 Repeat for the other shirt piece.

9.  Place your shirt pieces together with RIGHT sides together and pin and sew.  Make sure you don't sew your armpits closed! :)   Turn right side out. 

Putting it all together:
10.  Now- grab the shorts.  Pin together at the waist with RIGHT sides together.  

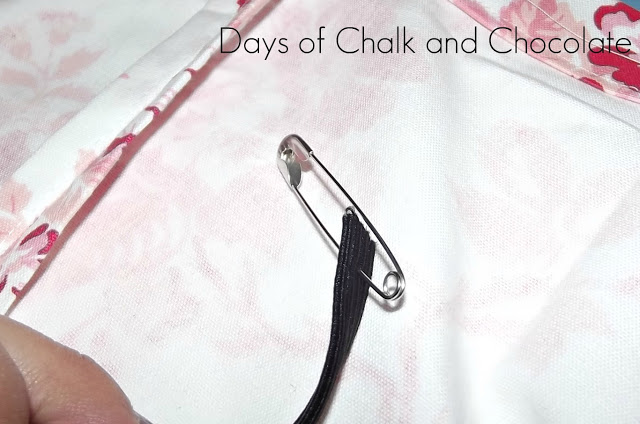
11. Change out your bobbin with elastic thread.  Hand wrap the elastic thread onto the bobbin.  Not too tight... not too loose.  Keep regular thread in your needle.  Now we are going to Shir the wiast (here is a great Shirring Tutorial!).  You want to start at your seam (not where the picture has the needle.) and do three lines on shirring up toward the neck.   

12. And just to make sure that we don't have any wardrobe malfunctions... lets add a strap for the other shoulder.  Cut out 2 strips about 1 inch wide and pull so that the roll up all nice (that is a quick way to make it look finished!) 
13.  Try the romper on to find the placement of the straps.  Pin and sew.

Put on your favorite little girl and go ROMP around! 


 Linking to:
Today's Creative Blog
Creative Itch Home Stories A2Z

Content Ad