Showing posts with label Felt House Along. Show all posts

Wednesday, February 24, 2010

Felt House Along Week 2 {Cutting out the side and Side 1}

Welcome to Week 2 of the Felt-House-Along! It was so fun to see the plans that everyone is getting together for their felt houses! I am going to include a McLinky on the this post so you can show off where you are at this week too!

This week we are going to Cut out our sides and roof and work on one of the sides! Are you ready? Let's dot it! : )

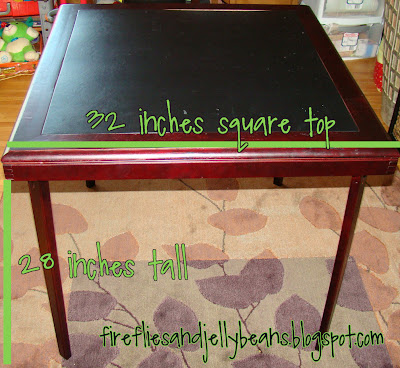
1. Measure your table. My table is 32 inches square on the top and 28 inches tall.
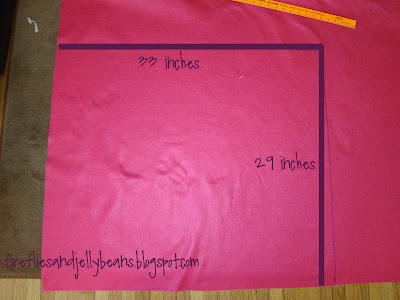
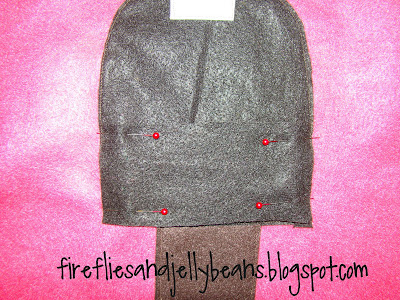
2. Cut out your sides. Lay the felt out flat (folded in half - that way you can cut 2 sides out at once!). When you cut out your sides you want to add an inch to each side length. So the sides of my house are 33 X 29 inches. The roof is going to be 33 X 33 inches. I used my yard stick to mark off each side.
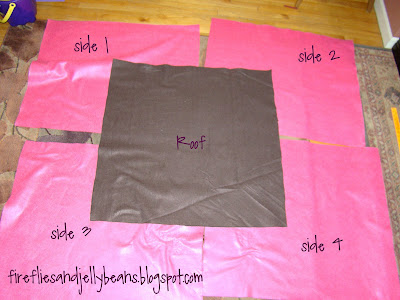
You need to cut out 4 sides and 1 roof. I did not have lining on the inside of my play house. You will need 4 more sides and another roof if you are going to do that... but I am not going to give directions on how to do the lining since I did not do that.

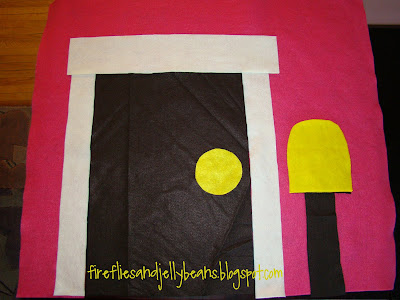
Now let start on decorating one of the sides! I am doing the front side with the door!

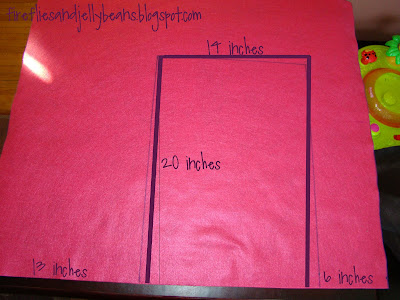
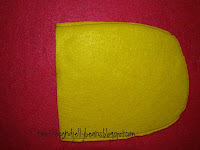
1. Mark off where your door is going to be. If you want to see my measurements for the door you can click on the picture to enlarge. Once you decide where and how big the door is cut it out of the side and use the piece you cut out as a pattren for the door.
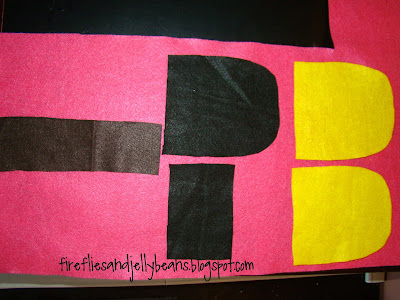
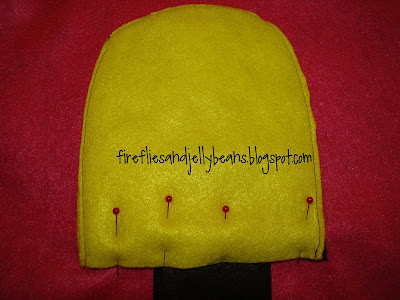
2. Cut out all the shapes that you want on your side. I have a door, mail box with pole, and trim for this side

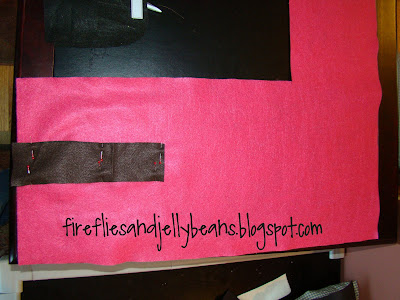
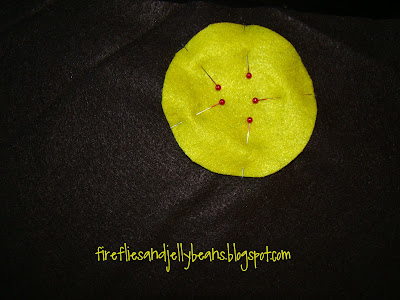
Here is how I made the mail box:
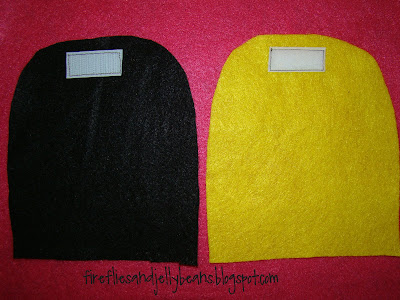
my mail box has 5 pieces: 2 front colored pieces (Yellow), one inside color (black), on rectangle pocket (black), and a brown pole.
Sew Velcro to one of the front pieces and the inside piece
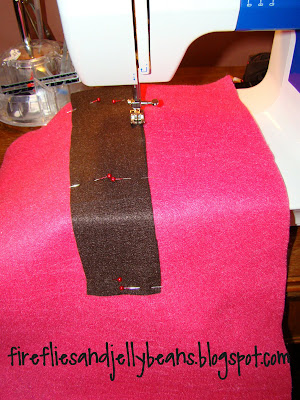
Sew your two front pieces together with WRONG sides together. Your Velcro should be facing OUT.
Pin your pole in place on your side.
Top sew it on!
Now place the black piece with the Velcro side up on the side, pin and sew.
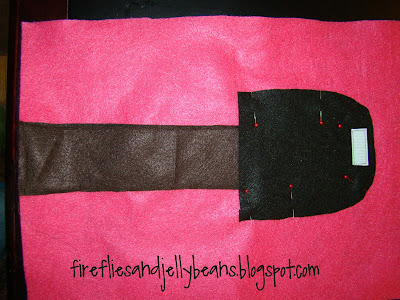
Now pin the pocket on and sew around 3 sides leaving the top open
Finally pin the top piece on with the Velcro side down (facing the black piece) and sew ONLY on the the bottom... now your mail box should open and hold mail!

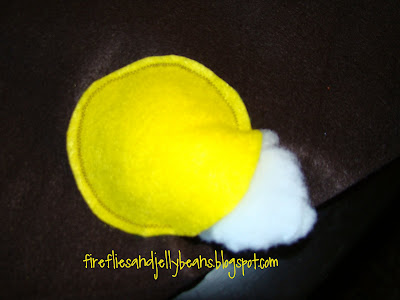
Here is how I made the door:
cut out a circle and pin it to your door. Top sew around the door knob...
...leave an opening so that you can add stuffing for dimension, then top sew the opening closed
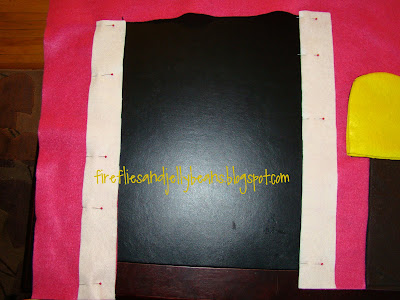
Now lets add the trim!
Pin your trim in place (My trim is 2.5 X 20 inches for these two side pieces) and top sew them on.

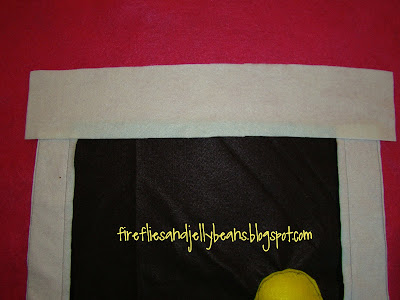
Sandwich the door between the tip and the side of the house (this top piece of trim is 4 X 20)

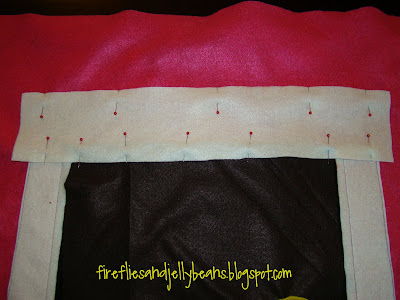
Pin the trim and door in place and top sew it on.

One side down... 3 more to go!


Here is how I did my lettering. I used Freezer Paper Stencils. I L-O-V-E Freezer Paper Stencils... I used them a lot. It is so easy and it looks so great! I knew I would not be able to cut out felt letters neatly. And I knew that I would not be able to sew them on neatly either. So the Freezer Paper Stencils was my solution to have NEAT letters.

1.Trace you word onto freezer paper (found at any grocery store or Target, Walmart, etc in the same aisle as the baggies). I like to print my words out in a font I like from my computer, but you can free hand it too.
2. Use an Exato knife to cut out the letters.
3. Iron the freezer paper (wax side down) to where you want you word to be. Make sure you iron is set to WOOL setting for felt (or it will melt... I know I melted some on my other felt house!) Make sure all your letters are stuck to the felt.
4. Dab your paint on over the letters. I use acrylic craft paint, and heat set it with my iron once it dries. You can also use fabric paint. I had to do 2 coats of paint for the felt.
5. Peel off the freezer paper (You can do this when the paint is dry or wet). Once the paint dries heat set it with your iron (set to WOOL).
There you have it BEAUTIFUL letters! :)


I am so excited to see how your houses are coming together! Be sure to come back and share with us what you have done! If you have any questions, just ask!

Wednesday, February 17, 2010

Felt House Along: Week 1 {Planning and Supplies}


Welcome to the first week of the Felt-House-Along! I am SOOOOOOO excited about everyone who is joining in on the fun!

If you come here and you want to go right to the Felt-House-Along post, I made a button on the top right side bar for you to click on for easy access! I was also thinking of adding a McLinky to the bottom of the post so that when you are done with the week's "homework", you can blog about it, and come back to link up... that way we can all come around and encourage each other as we are making it! What do you think? I will add the McLinky, and leave it open for a while. Leave me some feedback in the comments about what you think about the idea. Thanks.

Ok, are you READY?!?!?

Planning:
First, do some research... look at other felt houses out there in blogland. Here are some of the ones that I used when I was starting out!
This one is from Homemade By Jill I love it!


This one is from This and That so cute on the inside!


A very manly one from Sew Much Ado


A very princess one from Ikat Bag


And...of course, you could look at MINE! : )


Draw a Sketch:
Now that you are inspired, I suggest that you draw a sketch of what you want on each side of your house. It will give you a good and easy starting point! Think about the table that you are going to use, and if the sides are all the same or if some are longer. I used a 32 inch square card table. But other people have used their dinning room tables to make a bigger fort! Having a sketch will give you direction and help you see what it will look like. It will help you see if there is a big hole, or if it is too busy...Here is the sketch I used when I made my felt play house:

I also labeled the colors I wanted to use. Use this planning time to make some decisions. It will make it easier when your are shopping for supplies!

Measure you table:
Measure each side of your table in inches. Also measure the height of your table.

My table was 32 inches square and 28 inches tall

Now add an inch on to each side and on to the height for seam allowances. So each of the sides of my felt house as 33" (Wide) BY 29" (Tall) and the roof was 33" BY 33". You will need 4 sides and 1 roof. {I will go over this again in Week 2}

Supplies:
Ok, now that you have a plan, we are ready to gather some supplies!

Felt (duh!) I got mine from Joann's by the yard. You can also get it online at Fabric.com.
Here is what I got:
3.5 yards orange (for the house sides)
2 Yards brown (for the roof, tree, trim and door)
1 Yard Cream (for some trim)
.5 yards of the following for other little things:
Red
Blue
Green
Yellow
Black

I have a BUNCH of felt left over... But I like felt, so I am ok with that! : )
Here are other things that I used besides felt:
Thread - get a couple spools... it stinks not being able to finish a side because you are out of thread!
Velcro
Target Dollar Spot flowers
Buttons (for the bird eyes)
Freezer Paper and Paint (I Freezer Paper Stenciled the name and address... it was easier and looked better for me - you can also use felt if you want)
Stuffing

Ok, now go get planning and shopping! When you get your plan ready, come back, click on the Felt-House-Along button and link up your post so that I can see it! If you have any questions please feel free to ask!


Thursday, February 11, 2010

Felt House Along

So, There was HUGE interest in the Felt-House-Along! I am so excited!

As I have thought about this more, I have decided to add another week on to the Felt-House -Along and make it five weeks long. I wanted to give you a week to get supplies and make a plan and 4 weeks of sewing and putting it together. A good plan does wonders for a project so, I want to give it some time! I will have the Planning and Supplies post up next week sometime!

Here are some notes that I have for those of you considering:
Skill level: beginner (this should probably not be your FIRST project but if you can sew a straight line and cut out shapes out of felt I think that you are in!)

Table: You can use ANY rectangular table that you have! If you have a dinning room table that is rectangular that will work! The great thing about making it, is that you get to customize it!

Leave us a comment to let us know that you are joining and grab our button to spread the word!


The Show Off Your Stuff Party is still going strong! Scroll down or click here!

Content Ad